
Introduction
This website is set up to track my Option by Negotiated Study development progression work for my Masters at Staffordshire University. This module focuses on developing technical skills in Unreal Engine 4 (UE4) to strengthen my capabilities to produce content for future modules.
The project specific focus for this module is to perform some Research and Development (R&D) in two key areas – lighting and materials. These areas can be pivotal in creating realistic looking environments for games and virtual production. The R&D process commences with a base understanding of how lights and materials work for 3D applications, but a lack of understanding of specific game engine implementation processes, tools and techniques for these areas. UE4 will be used to help explore realistic lighting solutions and material solutions with the intentions of applying these techniques to a virtual production workflow.
My background is mainly from understanding lighting and production pipelines for image sequence rendering done in software packages like Autodesk’s Maya. Maya uses frame-based renderers such as Arnold, which calculate lighting behaviour on render, and produce image sequences of renders (Seymour, 2012). These still renders are used to blend with camera footage in a process called compositing, a process of combining at least two source images to produce an integrated result (Okun & Zwerman, 2015, p. 1010) – this process means higher quality lighting solutions that take hours to render can be used to achieve the most realistic result possible. Game engines such as Unreal Engine calculate the lighting solutions either real-time, or by calculating raytracing bounces and baking this into texture information (de Jong, n.d.). The resultant video sequencing happens real-time, so any performance loss created through the calculation of lighting impacts the final frame rate directly. Standard video broadcast framerate for screen delivery is 24-30 frames per second, where any frame rates lower than this can appear choppy and unrealistic (Okun & Zwerman, 2015, pp. 242-244). Documents such as The VES Handbook of Visual Effects will prove to be extremely important when identifying differences between traditional compositing approaches in comparison with real-time compositing approaches.
Process
Research will be performed to identify tools and techniques used by industry professionals, often from theory videos, official documentation, and tutorials. The knowledge will be applied to original scenes (not provided by tutorials) to gain a deeper understanding of the workflow, as following a tutorial verbatim often results in a shallow understanding of the topic. An iterative design process will be used where relevant to attempt to gather a deeper understanding of the techniques and processes for each project, allowing for opportunities to fail and improve progressively. Applying Kolb’s reflective learning cycle (1984) as explored within the Approaches to Flexible Learning module will help with providing a framework for identifying areas of improvement for my attempts, as well as investigating solutions to improving the work further.
Lighting Development
The Unreal Online Learning portal has a wide range of tutorials available across all areas of UE4, so this forms a solid place to get started learning Unreal Engine and light tools/techniques within the program. One problem which arises when following online tutorials is the tutorial source files are established and ready to go to work 100% with the tutorial content, however when you apply what you learn from the tutorial to your own scene, sometimes you encounter errors due to user error on your part. Knowing this, following along with the tutorial and then applying the tools and techniques to your own project is the best strategy.

Some key points to extract from this tutorial include:
- Light types – Movable for dynamic real-time lighting, however this light does not bake to textures, good for movable lights. Stationary light sources bake as well as act as a dynamic light – cast shadows on objects interacting. Static lights cannot move in world and bake well into textures.
- Light Baking – the process of baking lights to a texture.
- Lightmaps – the textures created from the light baking process. Resolution depicts the quality of the lights and shadows baked to the textures.
- Lightmass Importance Volume – This helps focus the lighting information quality to a set area – important for directional lights as these illuminate the whole scene.
- Light Portal – Specifies areas where light should be entering a window.
- Post Process Volume – The Post Process Volume controls post process effects such as Ambient Occlusion, global illumination settings, as well as indirect lighting bounces.
- Project Settings – Specific quality settings can be tweaked in the project settings – ray bounces etc.
These settings are key components to controlling the lighting process within UE4. Completing the course resulted in predictable results, but it is important to be able to apply the same lessons to personal scenes.
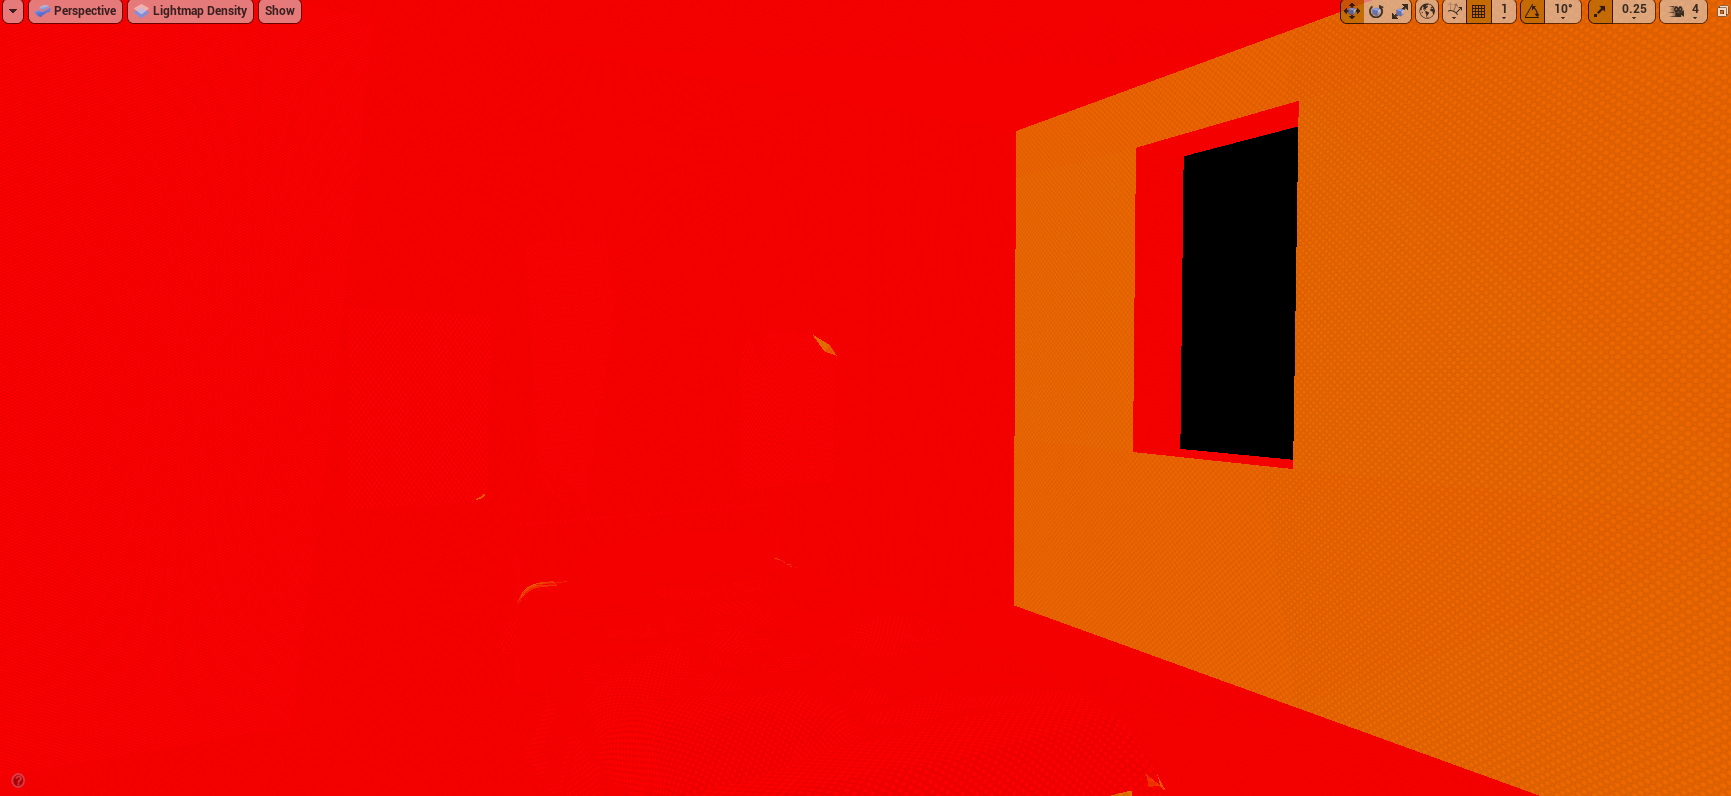
To start with applying these principles, a basic scene was set up using BSP blockout methods within UE4. The approach was to build on the basics, and set up a basic Cornell Box, without the colours, so the lighting notes can be applied to an independent scene.
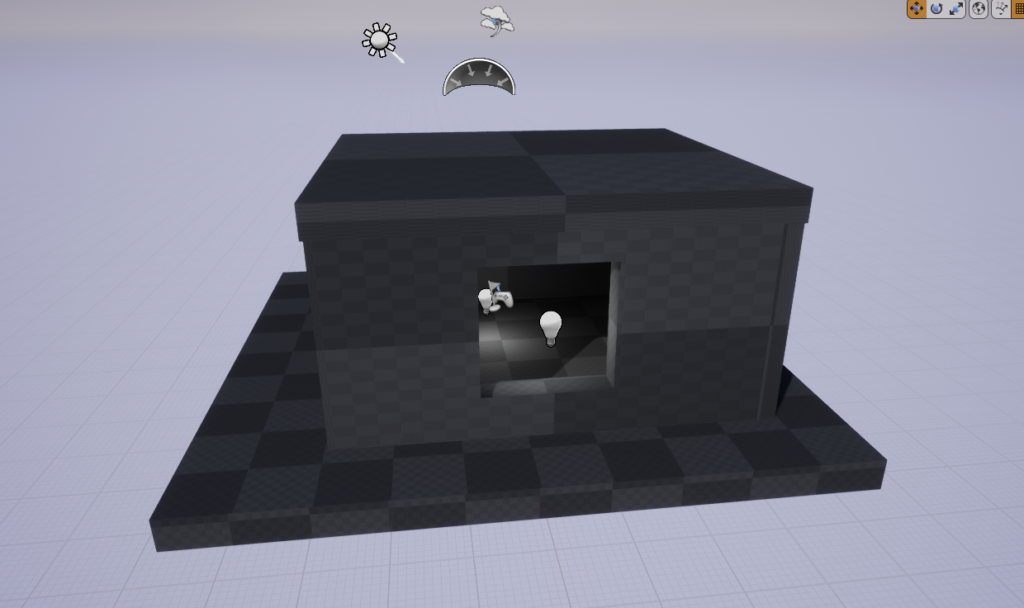
Early iterations of lighting experimentation
Point light, directional light, skydome within a BSP box – early tests are to see what results can be gained from simple lighting setup.
Lighting solution lacks shadow detail, accuracy of light bounce, visual interest. Ambient occlusion in corners not present. Overall result looks weak.
Extending these early tests, more techniques from the Lighting Essential Concepts and Effects course by de Jong (n.d.) were applied to a slightly more complicated BSP scene to identify if these issues were consistent across BSP scenes, or if the issue was just present in that one particular scene.

Attempts were made to simplify the scene to reduce the details on the BSP, in an attempt to identify if the source of the issues was the geometry, or the lighting. It was evident there were issues to do with the shadow quality, and the light bouncing. Research into issues surrounding the shadow quality revealed issues to do with lightmap resolution attached to the models. This was increased, and a better quality shadow was generated with a higher lightmap resolution.
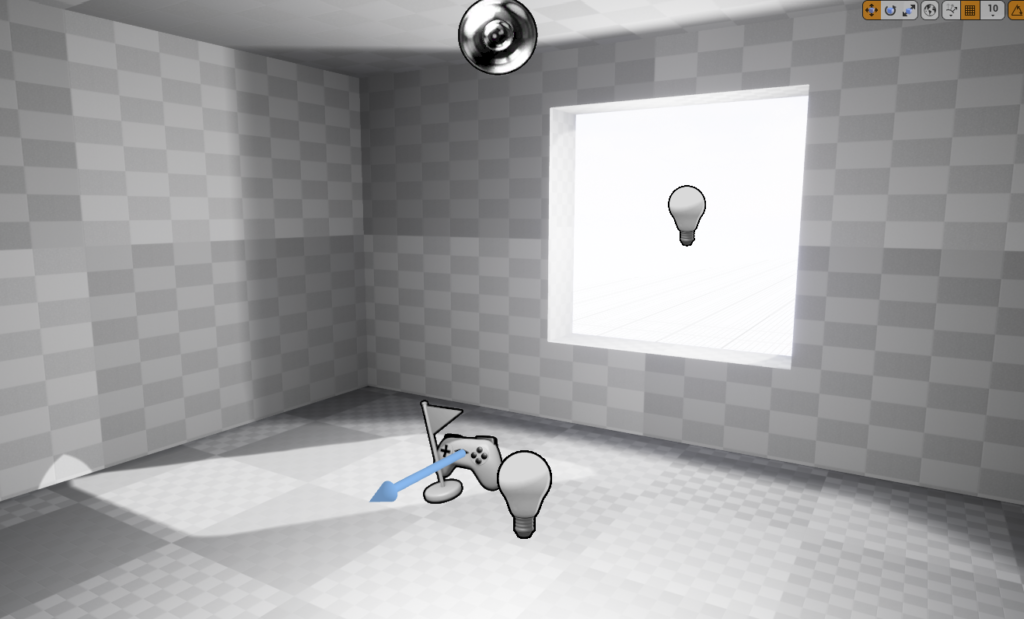
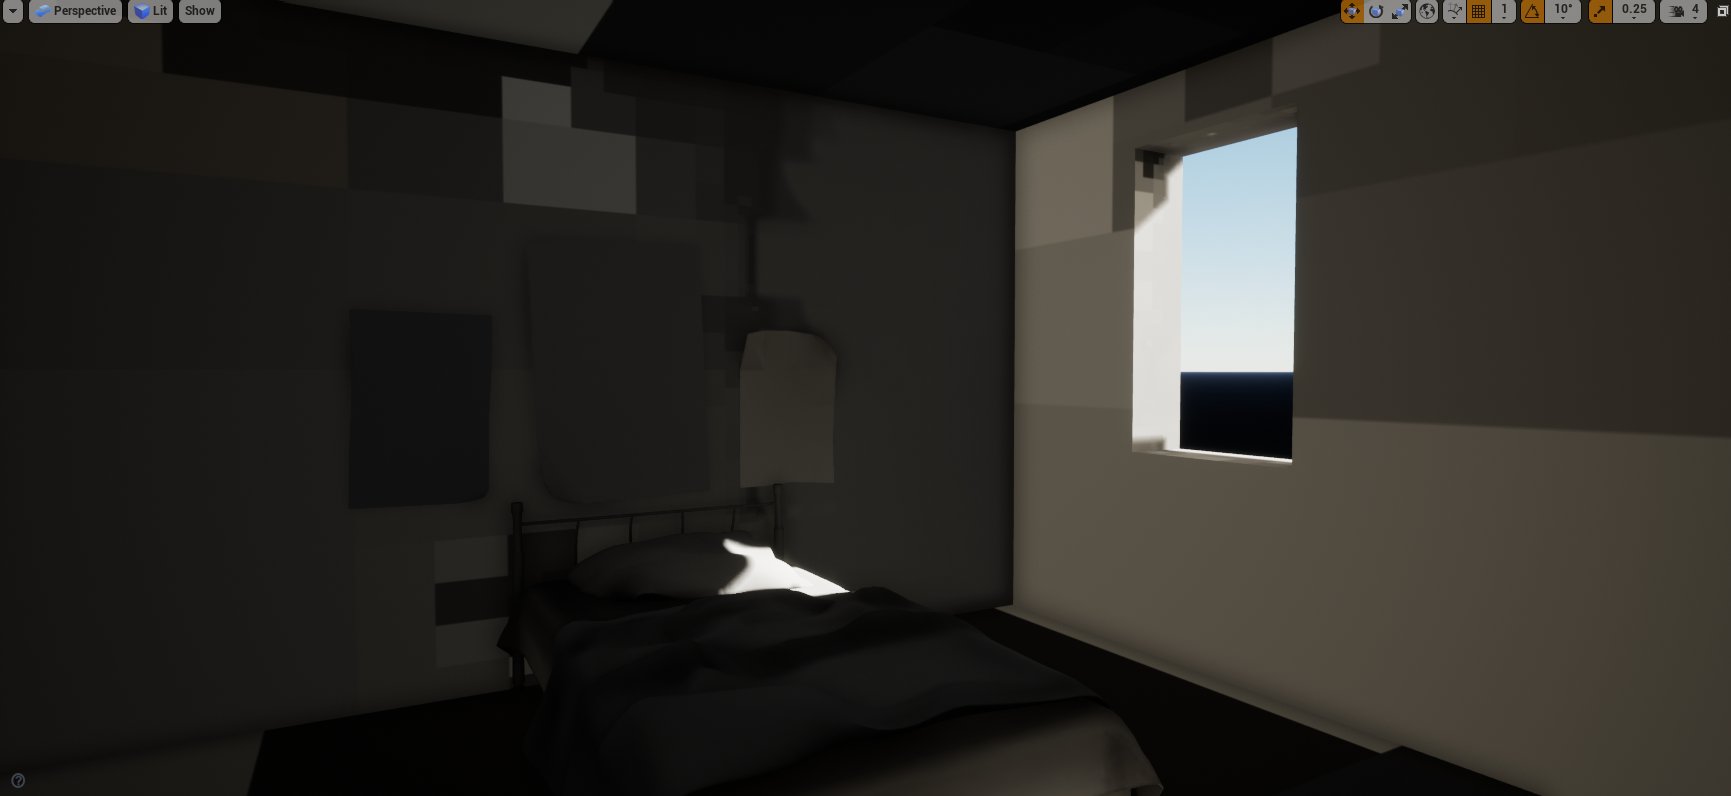
There were still issues present in the scene, including light not bouncing around correctly, and light leaking through the edges of the geometry as evident in the gif above. The scene wasn’t progressing as I assumed a large part of the lighting issues could be attributed to the lack of detail in the lightmap, as well as the geometry in the scene being BSP – actual geometry with existing UV maps might provide easier fault-finding approaches. To test this further, using default starter content which is already pre-UV’d, another basic light box with a window was set up and tested.


The results were still poor, with excessive light bleeding even though the lightmap resolution was adequate and the UVs were 100% perfectly fine on the geometry that was used in the scene. Further resources were needed to identify the areas which were not correct, so an additional scene was sourced to progress with lighting.
A new scene was downloaded from old 3D scene lighting challenges publically available from 3dRender.com. As the focus is to master lighting within UE4 to help build understanding of tools, techniques and workflow for UE4, the modelling process was not pivotal in achieving this.

3dRender.com lighting challenge scene – Modeled by David Vacek, design by David Tousek.
Can be found here: http://www.3drender.com/challenges/
Importing the objects into UE4, and setting up a quick scene, some issues were present when a general light setup was used. Areas were looking black and patchy, and a lot of lightmap UV error messages were generated on the light baking process. Some issues can be seen on the bedsheet, lampshade and cracks around the flooring which are 100% black, and the patchy desk on the right.
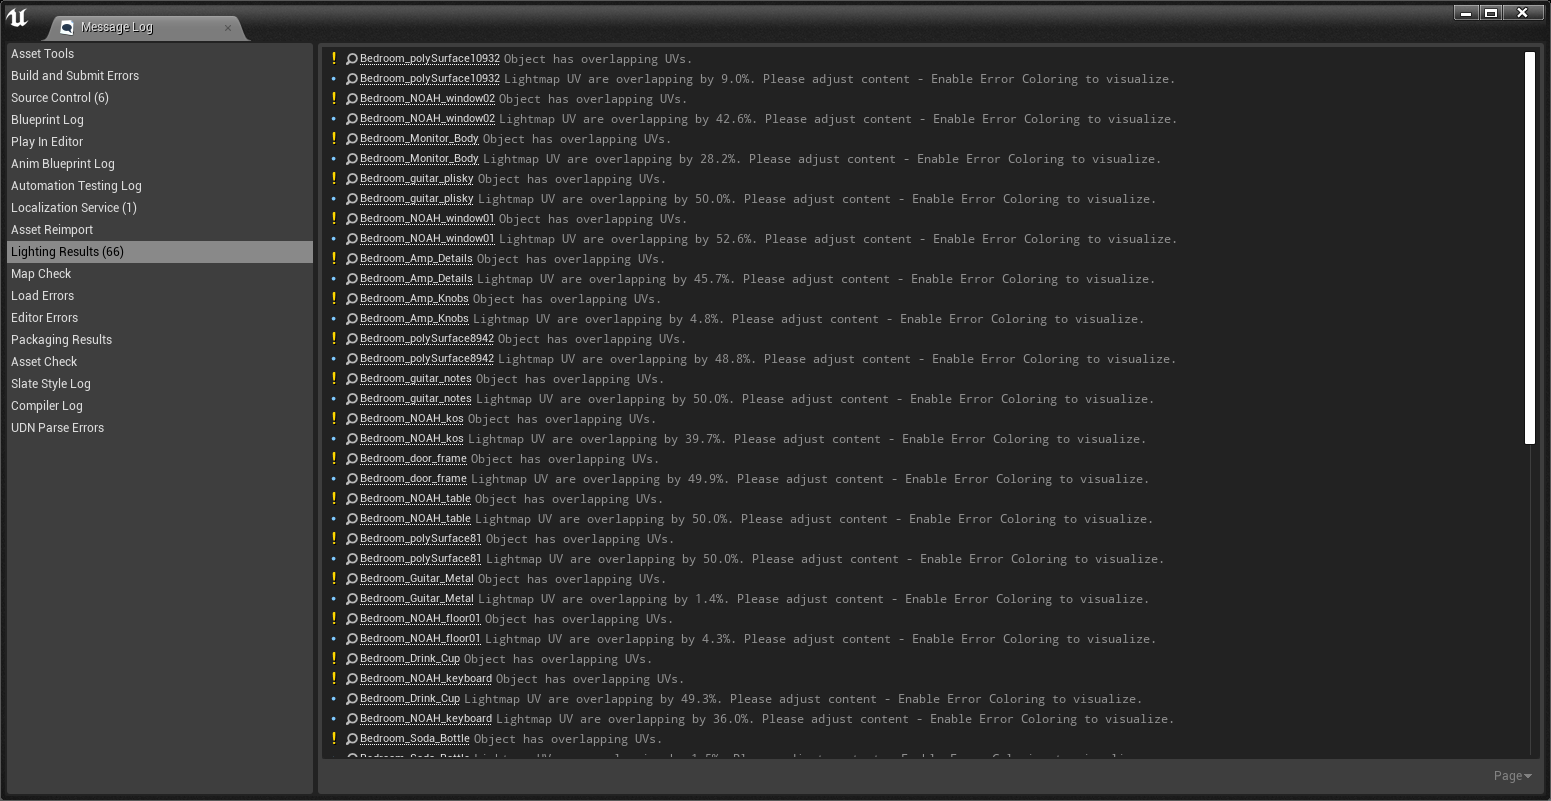
Errors were also evident in the MessageLog highlighting a large quantity of overlapping UV’s. Further research into the issue highlighted that lightmaps cannot have overlapping UVs, as the light is directly baked into a texture map. Inconsistencies with the geometry display caused by face normal direction on the models themselves, as well as inconsistent texel density made the light baking process quite difficult to achieve accurate results.
To attempt to remedy the scene issues to do with the baking process, I started re-UVing every object within the scene, and attempted to start to fix issues to do with normal direction on geometry. It was hoped that by fixing the UV’s and simplifying the scene, a decent light bake could be produced and lighting solution created.
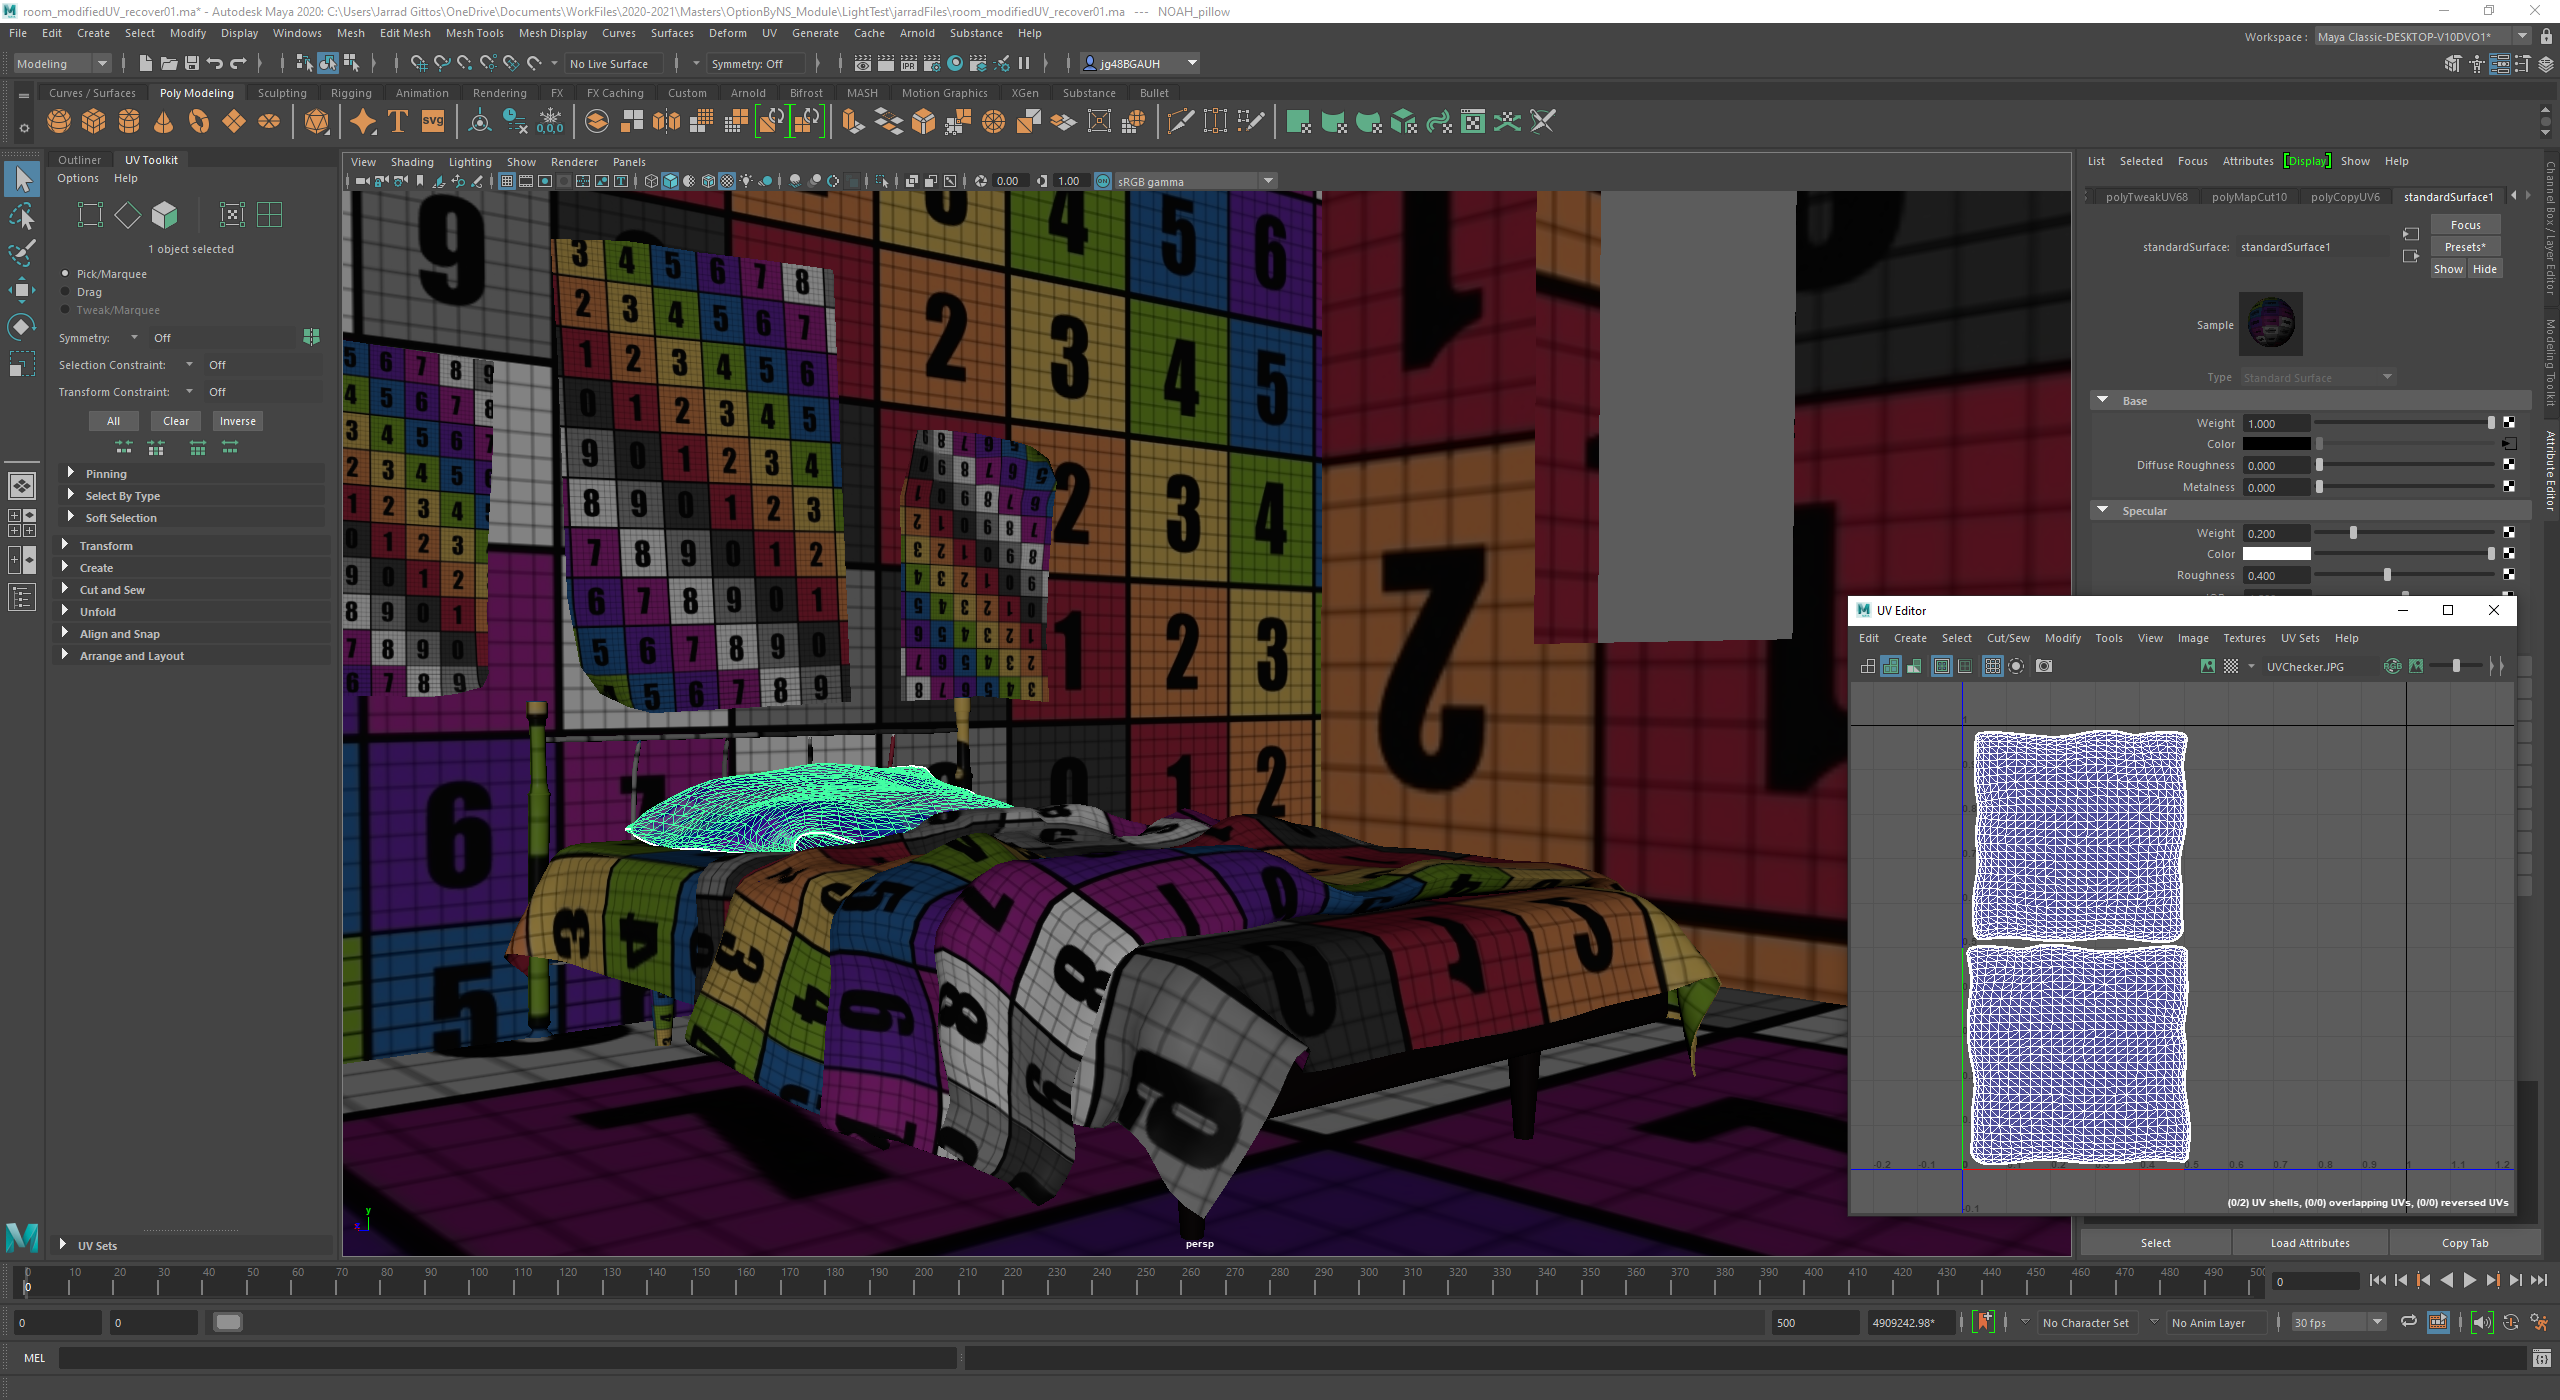
Lightmap for newly UV’d scene – not adjusted 
Default lighting setup for new scene


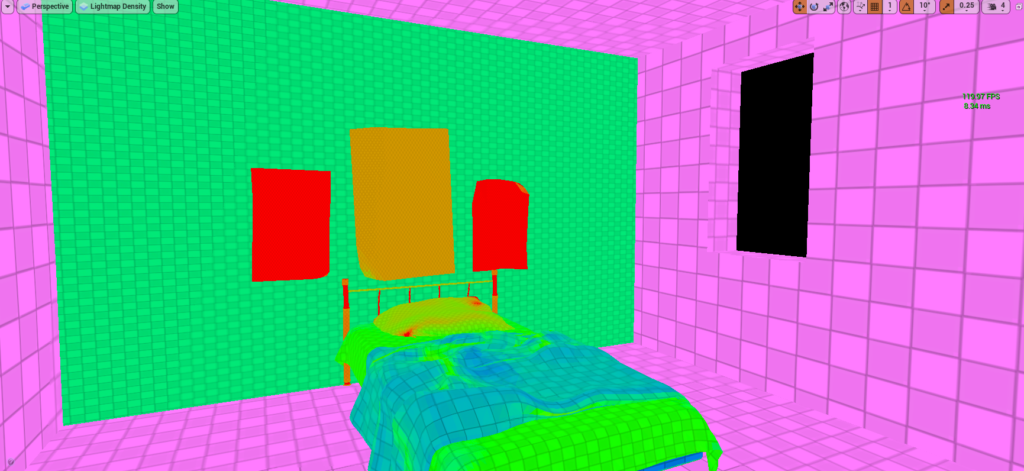
The lighting setup for the newly UV’d scene did not produce overlapping UV error messages. The lower resolution lightmap produced some light errors, so this was adjusted to increase the lightmap resolution to be a little more consistently high res. This can be seen by the red values for the lightmap resolutions on the following image.

Increased lightmap resolution to capture more details 
More errors produced for light details on the walls
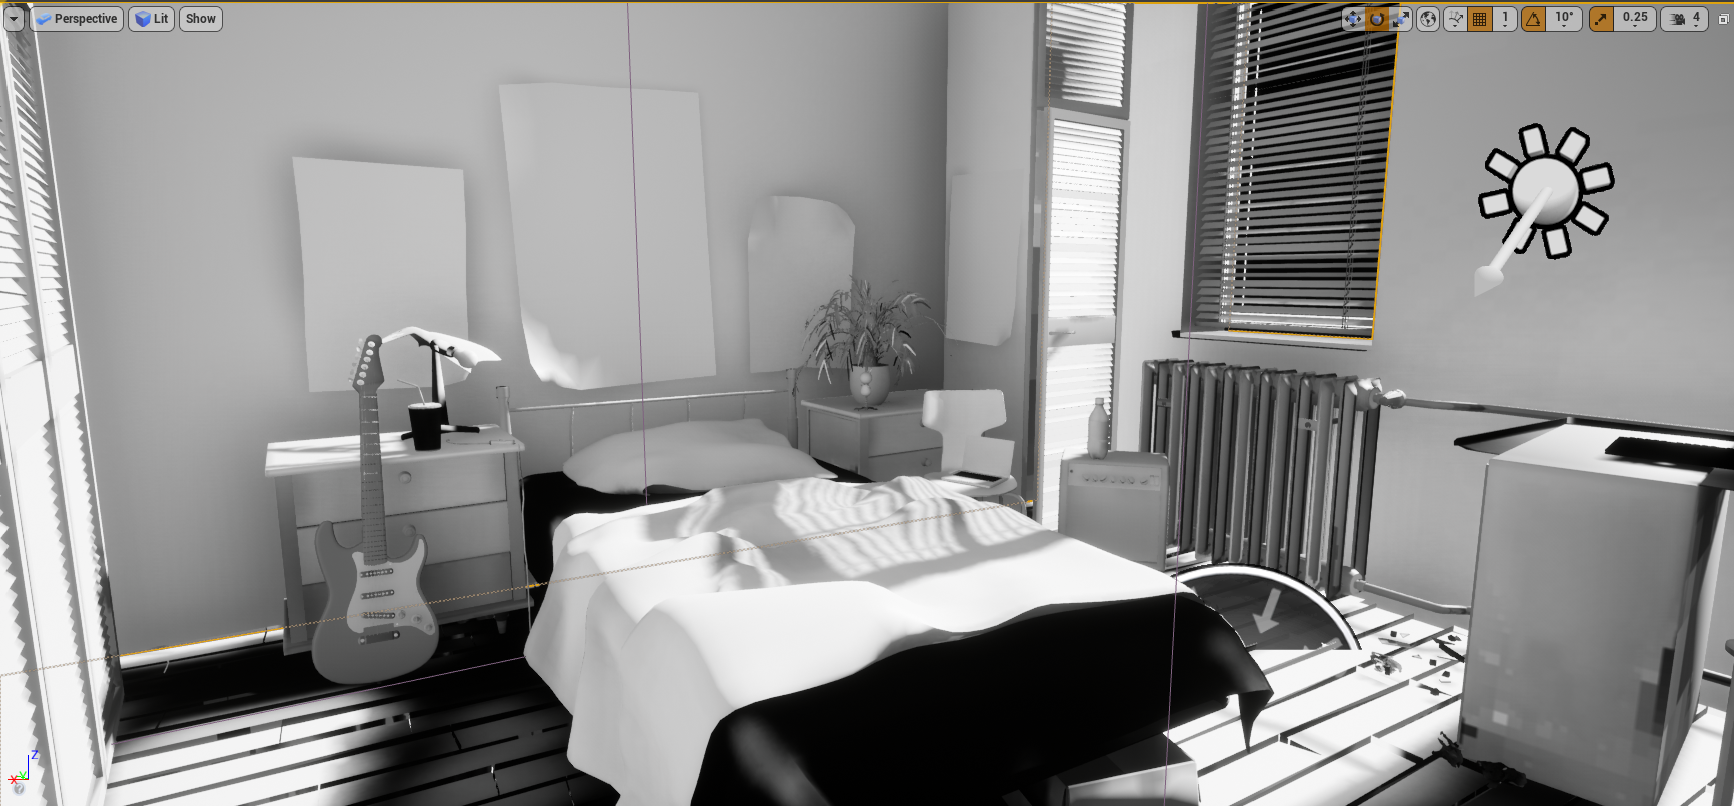
The scene seemed to be producing issues with the lightmap baking process, and it appeared that the wall was the worst area with blocky greyscale results. The issue may be coming from the UV unwrap, or single sided geometry, so a rough blockout was created to identify if the wall geometry was problematic.


The lighting solution looked more predictable, however issues were still present with the mesh. At this point, I was getting frustrated, and knowing that the raytracing lighting solution doesn’t require a lightmap baking process, I moved onto lighting with real-time raytracing.
Real-time raytracing lighting
Additional learning resources were leveraged to help work further on this different scene. The Unreal Engine YouTube channel hosts a wide variety of educational videos, product demonstrations and showcases. On 29th July 2020, Unreal Engine hosted a Webinar titled ‘Dive Into Real-Time Ray Tracing for Archviz with Unreal Engine | Webinar’ – hosted by Technical Artist Matthew Doyle which explored Real-Time Ray Tracing tools and techniques within UE4.

Some key points to extract from this tutorial include:
- Enable Raytracing – Enabling Raytracing within UE4 via using DirectX 12.
- PBR materials – suggestions on avoiding complex normal maps, high roughness, no extreme white/black values.
- RT Material Toggle – Toggle Raytrace materials with console variable (CVAR) r.Raytracing.EnableMaterials 0/1 toggle.
- Material Settings – for instanced PBR raytrace materials (RayTracingQualitySwitch node discussed).
- Mipmap Quality – Discussion on Mipmap for texture quality for increased texture performance for RT.
- ForceNoPrecomputedLighting – toggle to prevent light baking process.
- Brute Force RT Global Illumination (GI) – Accurate, however intense on computational power. Settings can be adjusted and increase.
- Final Gather – Set light bounce values and samples, cannot be adjusted.
- EV values of light – EV values of light on average (for 100 ISO camera). Outdoor Daylight: 12-15EV, Home Interior: 5-6EV, Offices: 7-8EV. These settings can be set as min/max EV in PostProcessVolume settings. Light intensity increased to counter balance EV adjustments.
- Reflections – Screen Space vs Raytracing. Screen Space only visible when on screen. Raytracing settings for reflections.
- Saving high quality screenshots from UE4 & Movie Render Queue.
This webinar highlighted some key considerations for the development of raytrace light solutions within UE4. Whilst the focus in the webinar was on architectural visualisations and the intended implementation of the lighting will be real-time cinematography, the principles remain the same. Resultant frame rate will be an essential consideration when adjusting lighting solutions as intended use of the 3D scenes is for real-time broadcast – 30fps should be the lower limit of acceptable framerates for my projects.
Setting up a single directional light and enabling raytracing produces extremely grainy results, but does bounce light around the scene in a predictable manner. The quality settings were set to Final Gather to remain optimised, however at the cost of a grainy result.

Changing this to Brute Force and increasing the light bounces brightens the room and bounces the light around further to achieve a stronger, more natural result, however this is at the cost of a lower framerate (sitting at 53fps, higher values increased light quality at cost of frame rate).

Adding additional Rect Lights to the scene injected a large quantity of light into the scene, and smoothed out the grainy result. It appears that more light increases the quality of the light solution, however decreases the frame rate. Further optimisation is required to identify a lighting solution which retains quality, but increases frame rate. The current solution below is sitting at 23fps, not suitable for real-time rendering however the lighting is much more resolved.
UE4.26 GPU Lightmass approach
Whilst the raytracing results were starting to look more accurate to realistic lighting, the frame rate was quite low in the scene. Further optimisation is required to identify a workable lighting solution for real-time cinematography applications.
A live stream by William Faucher, a VFX/CGI artist with over 10 years of industry experience from Norway took place on 25th March, 2021, showcasing Unreal Engine’s new GPU Lightmass released with version 4.26. This livestream recording showcased a new lighting method which leveraged the GPU to construct lightmaps, rather than the standard CPU.
The session discussed a new approach to realistic lighting for Architectural Visualisation, and more importantly compared and contrasted this technique alongside real-time raytracing. Some key points to extract from this webinar include:
- Enabling Texture Streaming in project settings.
- Enabling Raytracing in the scene.
- GPU Lightmass baking and settings involved.
- Comparison between real-time raytraced lighting and GPU Lightmass.
- GPU Lightmass approach and settings within Post Process Volume.
- New process > Using real-time to establish scene, baking to lock lights into materials.
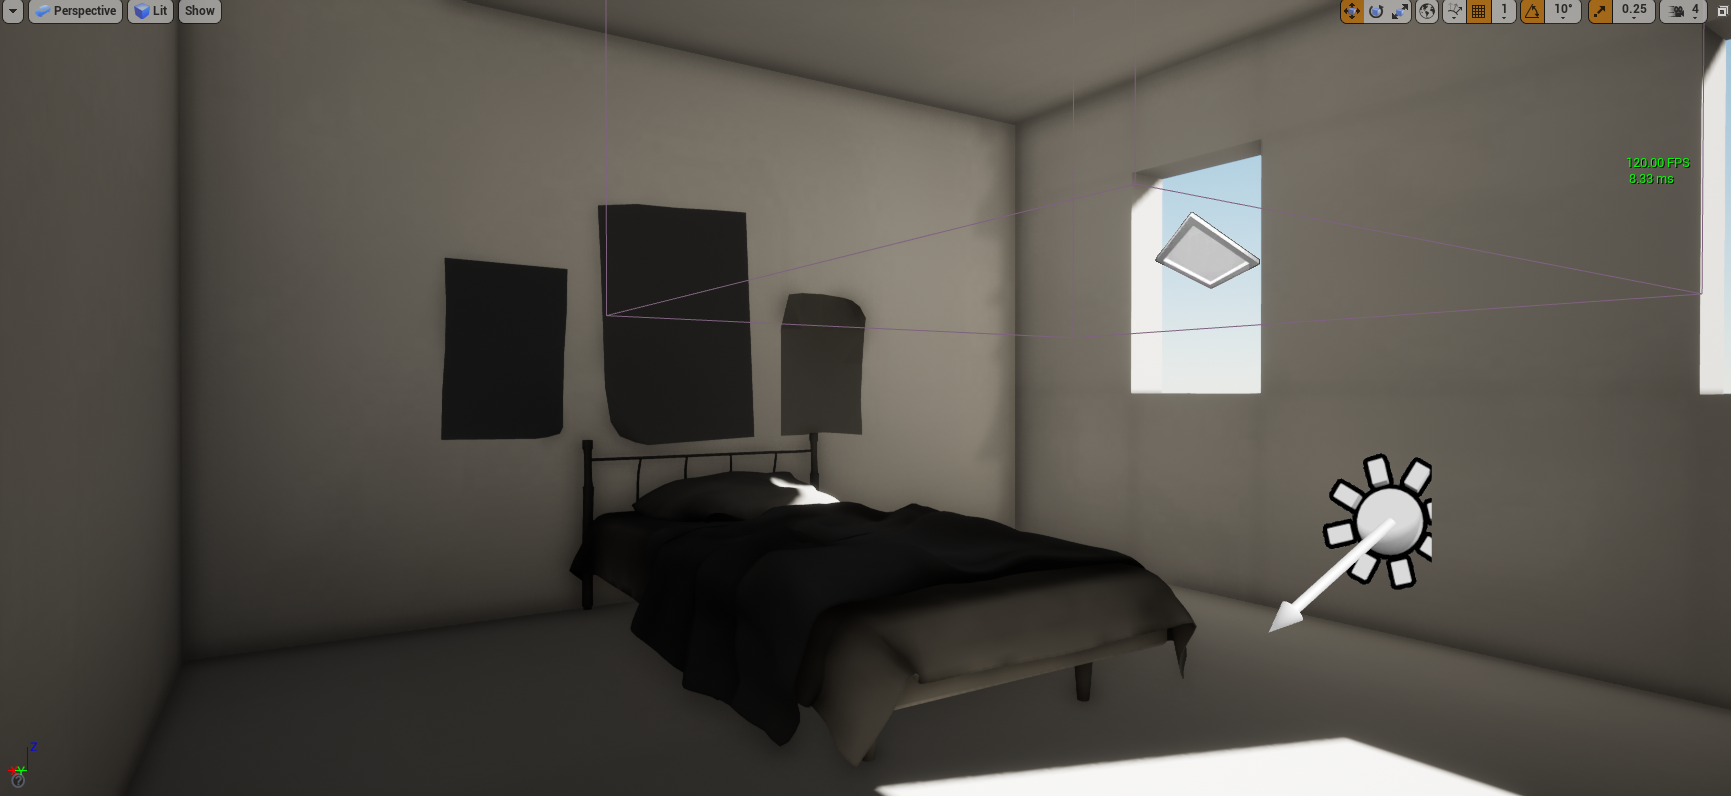
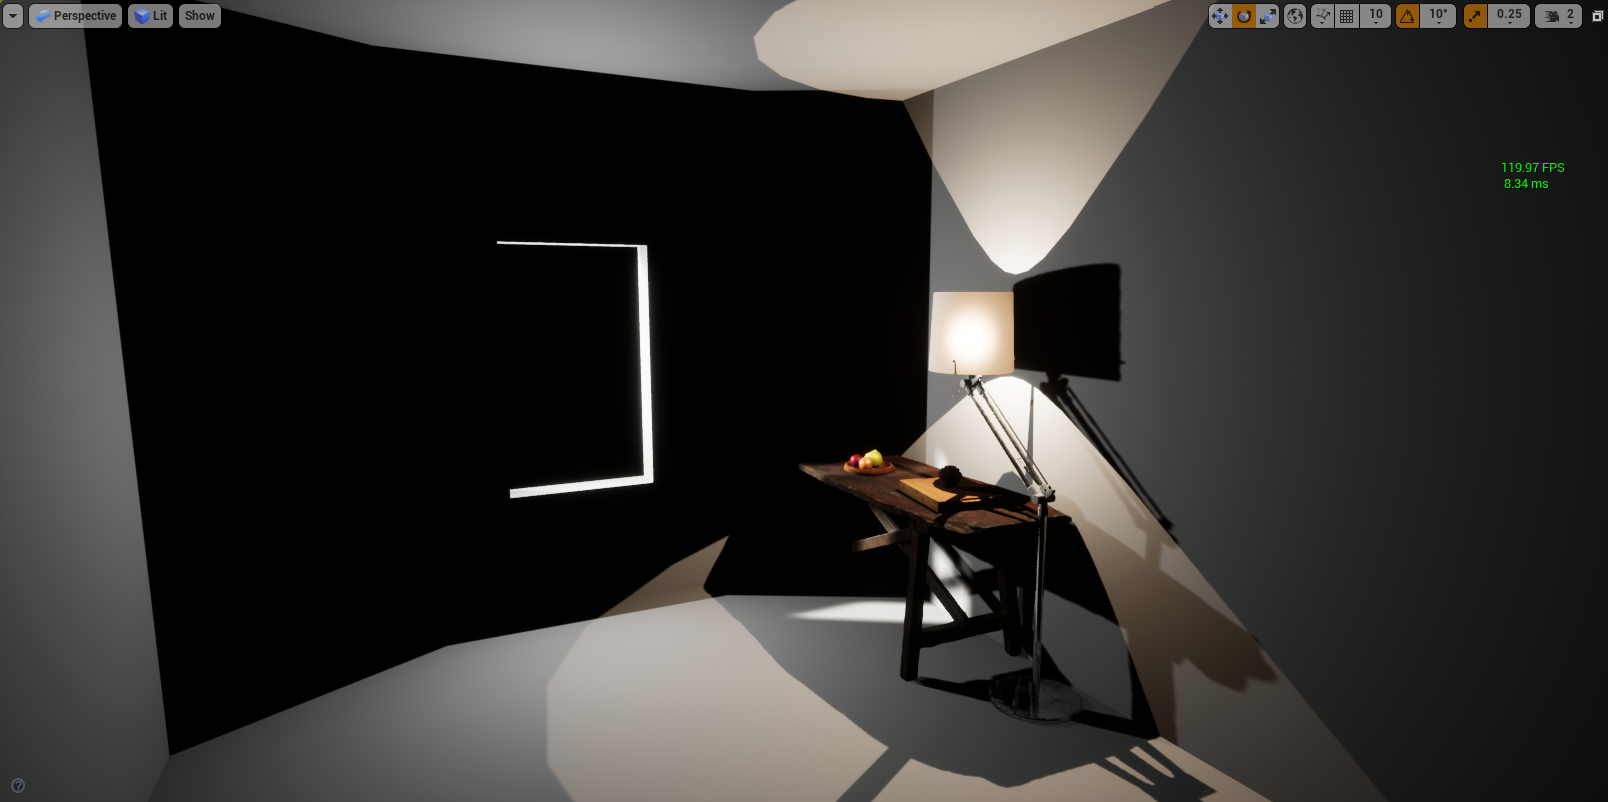
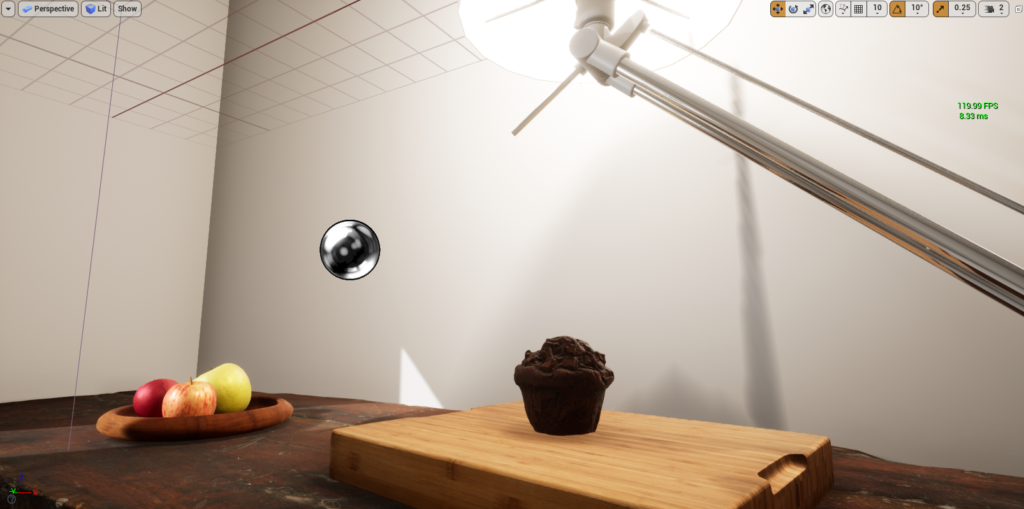
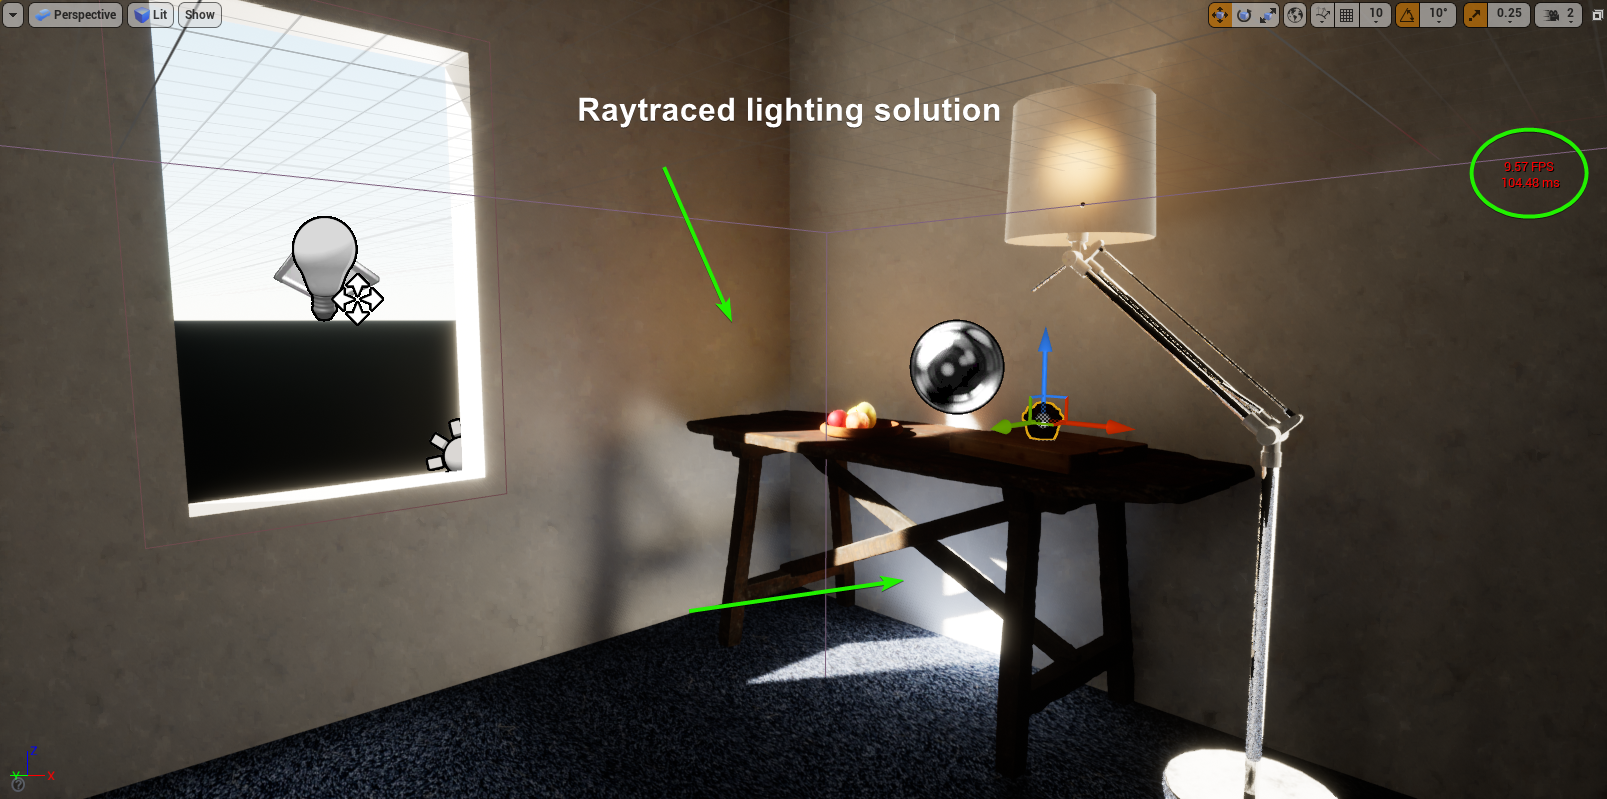
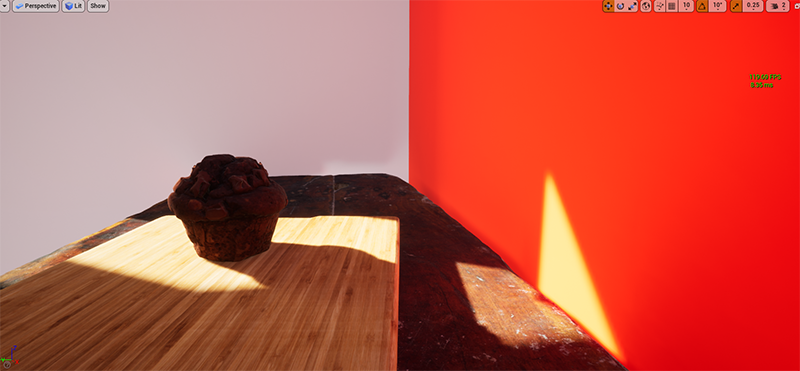
Following this session, further experimentation with different light setups was done. A new scene was set up using a combination of UE4 starter content (walls and floors), Megascans assets (table, bowl, fruit, cutting board and muffin), and my own asset (lampshade) to ensure all assets had appropriate UVs and were ready for lightmap creation. As this activity is less about the modelling process, pre-modelled and textured assets will reduce the scope of potential issues to lighting solely. It is important to test my understanding of the workflow of model/UV/texture and preparation for appropriate lighting, so the inclusion of the model prepared for this activity will ensure I understand the pipeline correctly.
A simple light setup was created, using a Directional Light to simulate light rays coming through the window, a Rect Light to flood light in from the window, and a Point Light for the lamp.
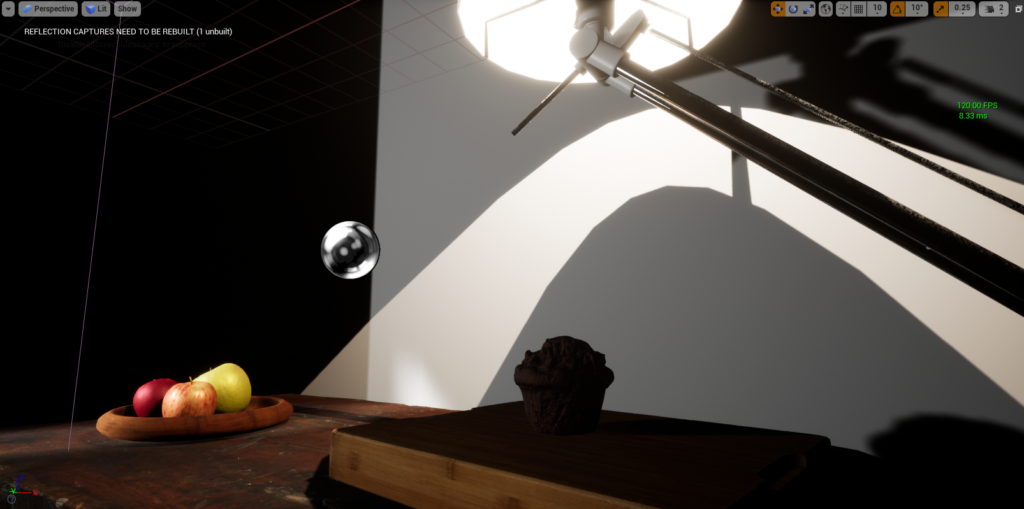
Enabling Raytraced Global Illumination creates an accurate looking lighting setup, however the result is extremely grainy/splotchy. Light cascades/bounces around the floor/wall nicely, however the frame rates and quality are quite poor. Frame rates sit around 60fps which is suitable for live broadcast, however the quality is not good.
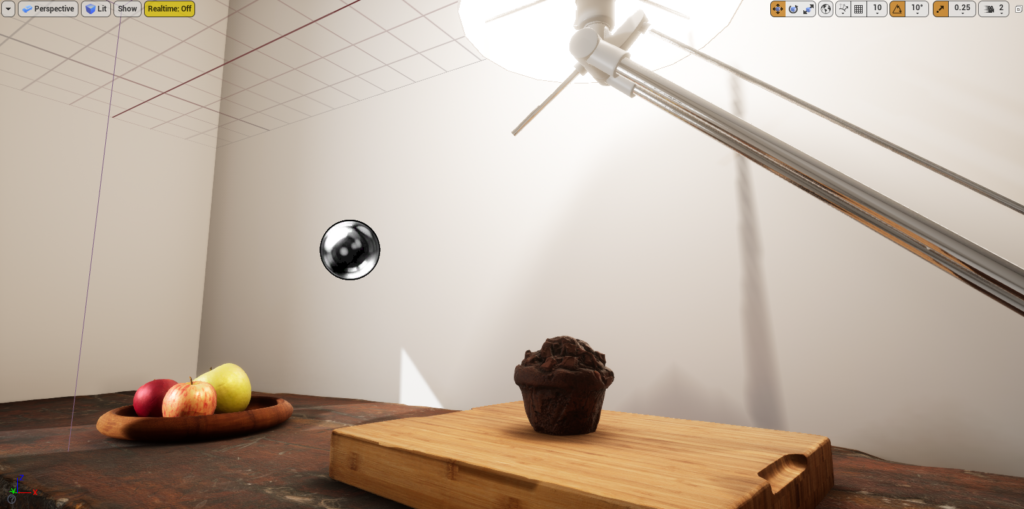
Switching to Brute Force Raytracing GI solution allows adjustment of the ray bounces and samples per pixel, which does increase the accuracy by increasing the number of light bounces, and increasing the samples does increase the visual quality of the outcome of the scene. Frame rates dropped below 10, which is unviable for real-time solutions.
As evidenced in the previous scene and real-time raytraced GI, the real-time solution likes a lot of light to achieve faster, high quality scenes, however this isn’t as effective for low light environments. The new GPU Lightmass approach introduced by Faucher’s livestream blends both accurate raytraced solutions close to real-time raytracing, with baked solutions using the GPU to speed up the process.
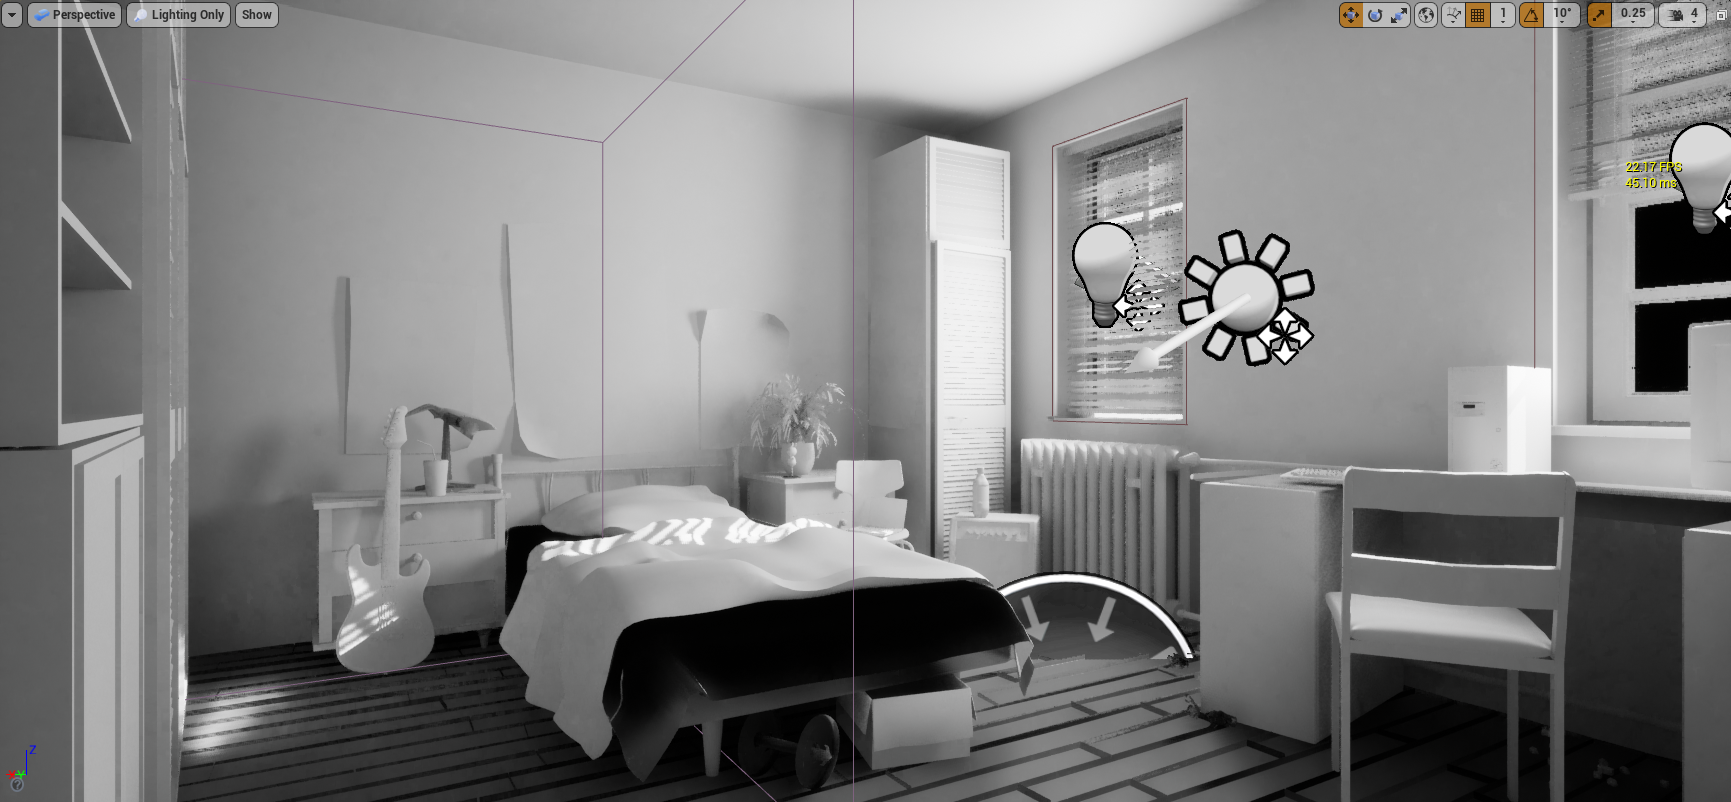
Comparing the different solutions of lighting side by side helps identify best workflows for accurate lighting. This comparison shows basic non-baked setup, real-time raytracing, CPU Lightmass and GPU Lightmass.
Noticable difference between the CPU Lightmass and the GPU lightmass is the shadows are more precise and defined with the GPU lightmass solution. Around the base of the muffin, cutting board and fruit bowl shows a darker shadow cast. Light splash on the walls is brighter due to correct subsurface materials being utilised for the lamp. Colour bounce from GI light rays is present, albeit subtle in the GPU lightmass solution. This can be best viewed when comparing coloured walls/floor with direct light hitting the coloured source.

With the GPU Lightmass baked solution, light bounces dynamically picking up the colour of the surface the light is bouncing from. This can be seen from the carpet light bounce, as well as the table light bounce. Comparing this to the raytraced solution
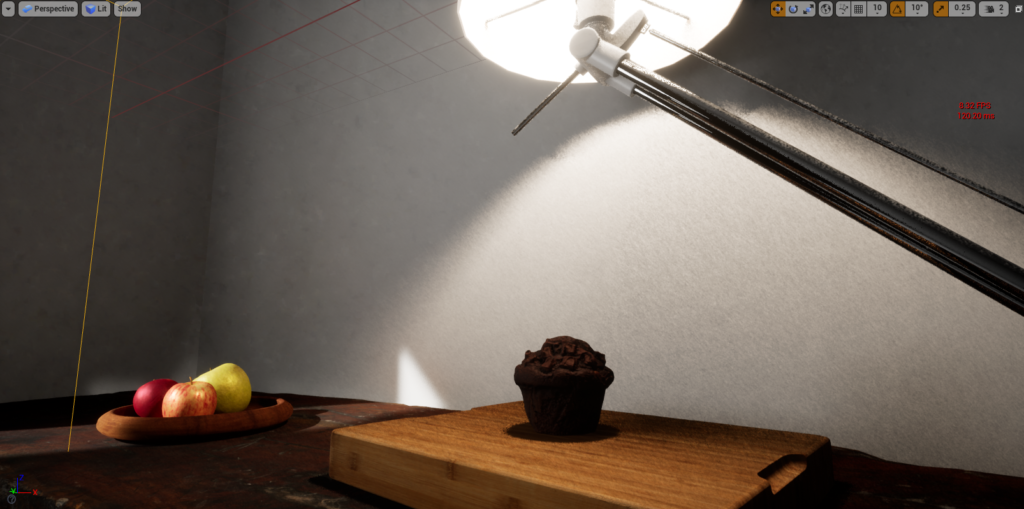
Whist using the GPU Lightmass solution isn’t 100% accurate to the real-time raytraced solution, it does a solid job of replicating the lighting and baking the lights to textures. The results are a much faster light solution in terms of frame rate (capped 120fps), and a much smoother result at a tradeoff of dynamic lighting control.
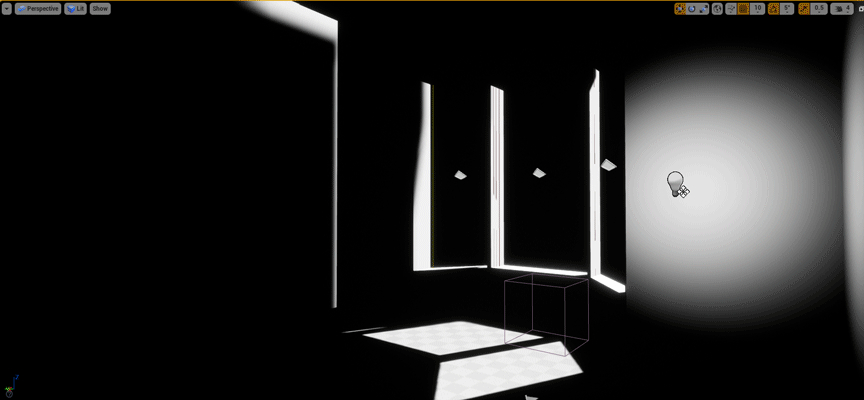
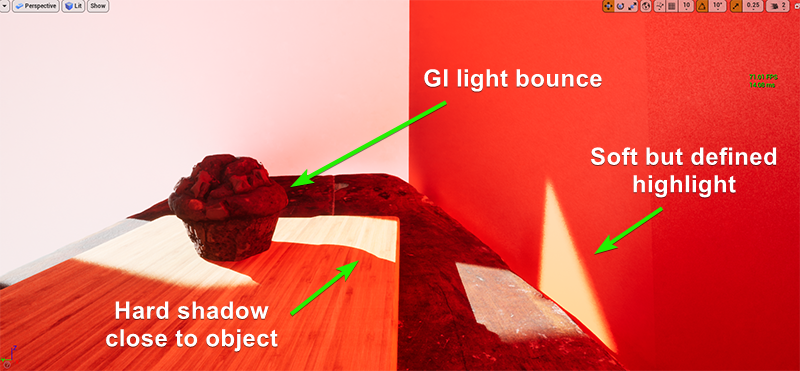
Shadow Quality
The shadow quality varied depending on the settings used. While testing the impact of Global Illumination colour spill, some inconsistencies were identified within the shadows cast by the primary directional light. The real-time raytraced solution appeared to have a blurry shadow cast from objects from a distance away, and crisp shadows being cast from objects closer to the surface catching the shadows. This is evident in the image below, where the shadows of the window frame are soft, and the shadows of the muffin are crisp. This is controlled by the Source Angle attribute within the light. Raytraced lighting will be the most accurate solution, with light bakes aiming to achieve this goal. When baking the lights using various, there were some issues evident with the resultant light solution which should be mentioned, as these errors highlight some important considerations when creating lighting solutions for virtual environments.
Performing a CPU light bake identified some serious issues to do with the light solution. The resultant shadows overall were quite poor, having inconsistent edges on the shadow/highlight borders. Some strange shadow/highlight artefacts were present on the mesh, where the UV seams were positioned. Lastly, the shadows around the base of the muffin were not defined and resulted in the muffin appearing to be ‘floating’
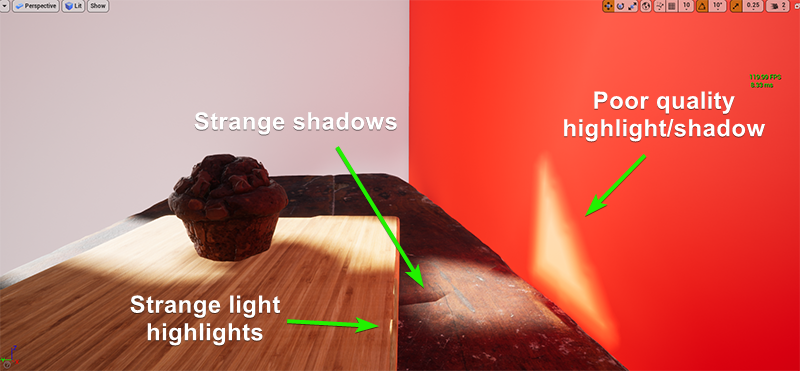
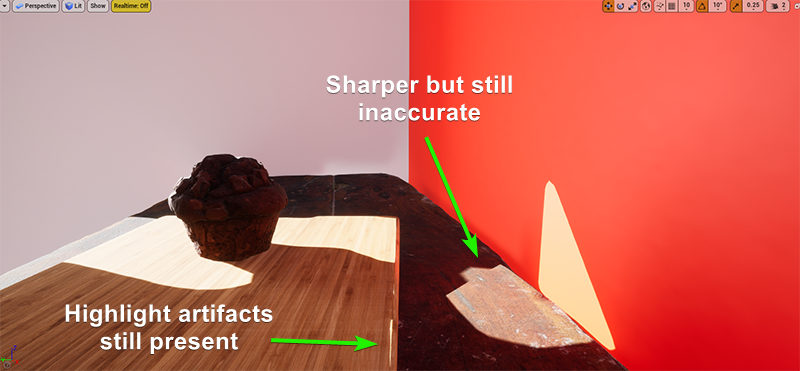
The GPU Lightmass solution was slightly better, however there were still errors present within the shadow edges. The edges were noticably crisp on the wall and on the cutting board, and when an A/B comparison is done alongside the real-time raytraced solution, it is evident the shadows are far from accurate. Highlight artifacts are still present on the cutting board, which is problematic.
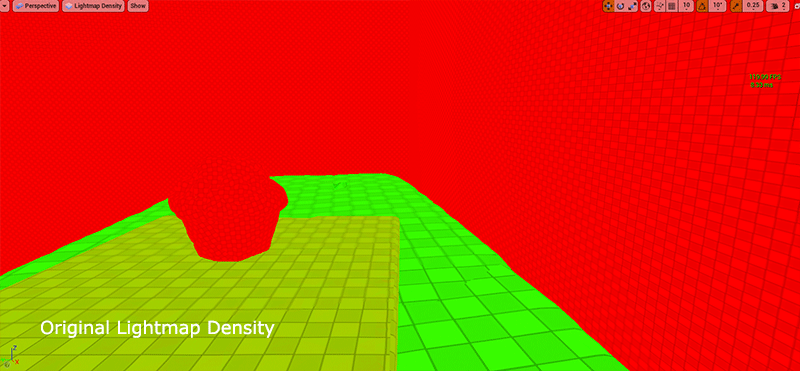
Investigating this further, it was evident that some objects had poor shadows, and some weren’t as bad. Leveraging the lessons from previous shadow quality issues, the Lightmap Density was looked at to reveal some objects with lower lightmap density. This can be seen in the GIF below, which revealed green Lightmap Density on the table/cutting board meshes. These were increased, and the renders were redone to test to see if the problem was resolved.
GPU Lightmass bake results in more accurate shaped shadows being cast, however the hard line of the shadow being cast makes the final result look unrealistic, and inaccurate to the real-time raytracing solution. Further investigation into this issue identified the cause behind this (on a UE4 forum) as the directional light being set to stationary for the light bake solution. By altering the light mobility from Stationary to Static, and re-baking the solution, the shadows appear to be more accurate to the real-time raytraced solution.
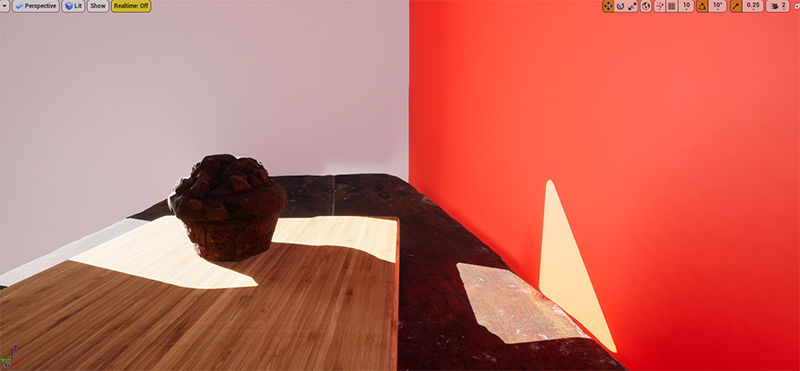
It is important to ensure the Lightmap Density is consistent across all objects within the scene. If lights or shadows appear to be baked incorrectly, have strange artifacts, and low quality, it is likely due to the Lightmap not being dense enough. Adding to this, if the shadows from directional lights are too crisp, investigate the movability attribute on the light to see if this is set to Static, or if it is set to Stationary – Movable will not bake to a lightmap.
Light study conclusion
When it comes to finding a solid lighting solution, there are a wide variety of factors, considerations, tools and techniques to understand to get a relatively realistic looking solution. Whilst the final result doesn’t represent a final fully finished scene, the objective of this light study was to perform a deep dive into various techniques, and evaluate the best workflow and approach to realistic lighting solutions within UE4 to better prepare me for future masters projects. Some key observations were made in the general setup of the scene and final lighting solutions.
Scene Setup
Post Process Volume is where you can control all settings to do with raytracing, exposure, reflections, quality of raytracing etc. This is needed, and unbound must be checked to affect the whole scene. Lightmass Importance Volume can help focus light quality within the space the box occupys. Lightmass Portal Volume helps direct light through windows to increase the visual quality especially for directional lights. The scene is influenced by the materials within the scene, PBR materials can help develop a scene. Positioning of geometry should not allow light leaking into the environment. It is important to lock the min/max exposure values to the same value in the Post Process Volume, otherwise it can be extremely difficult to adjust the light values.
Mesh/Geometry
The scene setup requires models which are set up correctly. The models must not have any overlapping UVs on the lightmap UV channel (Channel 1), which can be created either on import by UE4, or custom created in a 3D package prior to import. The Channel 0 can have overlapping UVs however, as this channel is primarily used for texture allocation. Any issues with the mesh turning black on lightmap build are due to normals facing the wrong way on the model. BSP does not work well with lightmaps, and can produce some strange results. The Lightmap Density should be uniform across all models in the scene, where Green colour is optimal for games, however this can be increased for better quality shadows with lightmap bake time increase trade-off and memory trade off. Mesh should not be single sided as it has a danger of light leaking through geometry.
Light Setup
For higher quality real-time raytracing, more lights can smooth out the quality of a scene as lower quality settings are needed for a decent result. Raytracing can form a strong foundation for setting up a scene, as the results are accurate and fast, however there are some performance limitations when it comes to smooth real-time raytracing. Only one Directional Light is needed for the scene, light can be derived from the new HDRI light dome. Rect Lights can be used to add flood light sources in windows. With high exposure values in the Post Process Volume, light candelas must be quite high to compensate. For real-time raytracing, lights must be set to moveable, however for baking they must be set to either static or stationary to bake correctly. For Directional Lights, static should be used to get correct source angle shadows (softer edge) – stationary results in hard shadows from directional lights.
Light Baking
GPU Lightmass seems to be the best solution to the light baking process, as it is more accurate than CPU light baking processes. Shadows are more accurate around base of objects, and Global Illumination colour spill seems to mirror results from real-time raytracing, where these are less pronounced/accurate with CPU light baking. Results with light baking sit at max framerate (120 in this case), versus ~10fps for real-time raytracing of similar quality. While real-time raytracing does not require any light bakes, baking does seem to be the best solution even on a high end PC/GFX card.
Materials Development
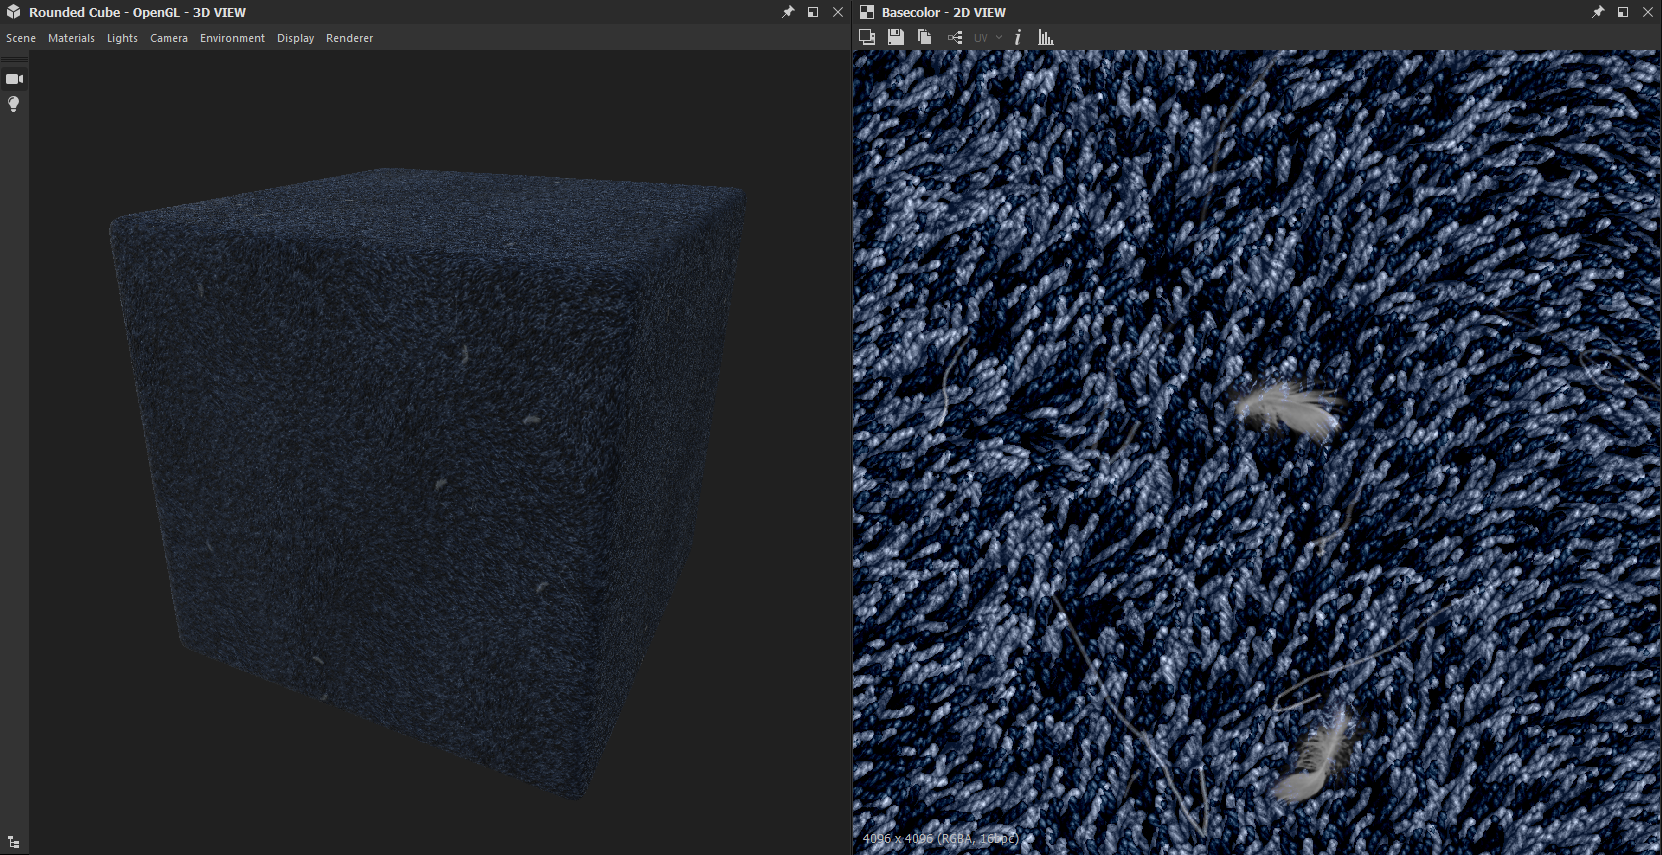
Materials and shaders play a crucial role in the look and feel development of environments and 3D assets, as they interact directly with the light within virtual environments. Materials can also drastically impact on framerate, so it is essential to understand the properties of materials, and how you can leverage these properties to create realistic looking materials which work effectively within real-time game engines. Multiple techniques will be investigated to explore the different workflows attached to material creation. To be more specific, Physically Based Rendering (PBR) material development will be explroed further. The Substance package from Adobe will be leveraged to create materials using three main methods – manual material painting method using Substance Painter, procedural generation of materials using node networks within Substance Designer, and AI driven material creation using Substance Alchemist. It is hoped that the process of creating materials using the three different methods will reveal best pipeline processes for creating various assets throughout a scene
All materials have some sort of reflectance value, and these can be determined by texture channels which instruct shaders how they should be dealing with light (Russell, n.d.). PBR materials are split into three primary channels, colour/albedo channels which describe colour information, roughness and metalness channels which instruct shaders how to handle light interaction, and height/normal maps which influence the physical form (Wilson, n.d.). The Substance ecosystem allows for direct control over colour, light and reflective properties through roughness and metalness channels, as well as form through normal/height maps of materials. The project aims to investigate how these channels can be controlled and manipulated, workflows involved, and implementation into game engines with the objective of achieving realistic looking results.
Substance Painter PBR Materials
Substance Painter allows you to control the properties of materials through a variety of channels:
- Colour Channel – all the colour properties of the material.
- Roughness Channel – how the material interacts with the light. More rough materials (value of 1, or white colour) diffuse the light completely, where less rough materials (closer to value of 0, or black colour) reflect the light/specularity more creating smooth looking textures.
- Metalness Channel – if the material is metallic or not. Altering this channel defines how the light interacts with the material, and applies a fresnel effect to the light interacting with the material if it is metallic.
These three channels primarily control the properties of a material, with the Normal map being used to help define form of the material. Additional channels such as emissive can be used to create glow effects, however these are less prominant within general textures. Within Substance Painter, the majority of the work is done within masking methods to select different areas, and apply material properties to these areas.
In an attempt to understand the UV, texturing/material development and engine implementation process, a model was constructed and unwrapped to understand the workflow. No overlapping UVs were used as this would create issues on the lightmap, as evidenced in the early experimentation with the baking process.

The higher polygon model was baked to texture to be applied to the lower polygon model, so the smoothing details are retained at a texture level. The resultant normal map is subtle but does help smooth off some of the low poly geometry.
This interview, titled ‘Learning Substance: Professional Tips and Tricks’ on 80.lv of James Ritossa (2017 – https://80.lv/articles/learning-substance-professional-tips-and-tricks/), a Hard Surface artist at 343 Industries provides some suggestions to enhance material development using Substance Painter. Main points to take away from the advice provided by Ritossa include:
- Use the generators & smart masks to create dirt/dust details, as every object has some level of dirt or dust.
- Use other materials (or manipulate existing materials) to achieve the look you are going for – focus on details and patterns to create looks.
- Don’t just stick to physically correct material values – experiment with roughness and base colour more. Don’t make materials too glossy.
- Variation or randomness makes materials look more organic. Play with roughness to achieve finger prints, smudges, water dots etc.
- Use layers and think about how materials are layered in real life – reference reference reference.
Using this approach, some materials were applied to the lamp model after the high poly normal baking process. Basic material properties were defined only using the metalness, roughness and colour channels.

By assigning a value of 1 for metallic, and reducing the roughness value, chrome properties were produced. Reversing that, zero value for metallic and mid to high roughness values creates a plastic aesthetic. Further details such as dust should be added to create materials which look a little more natural, and less pristine. Whilst the reference itself didn’t have much wear and tear, or stains/mess, it did have dust – references were leveraged and layers were used to create a dust layer.

- Reference of the dust on top of the chrome material
- A world space normal map (generated on import of 3D model into Substance Designer) can be used to identify normal direction – this is important as the dust only gathers on the top of the models, so this can be isolated by selecting the normal colour range of the Y direction.
- A black/white mask was generated based on the Y normal direction
- A blur was used to soften the edges, as the mask was too sharp – dust does not have a hard line to it
- A noise generator was used to vary the distribution of the mask – the edge was too straight for organic dust
- A manual paint layer was used to remove the density of the mask – the result is a mask which only has masked noise on the top of the model, but in a random, distributed pattern
Using layers, noise generators, selection mask methods and adjustments to the properties dust was added to the top portion of the metal areas of the the lamp. The dust layer added complexity to the roughness channel, as well as the colour channel to help mimic the properties of dust.

Further masks, emissive materials and normal/ambient occlusion adjustments were made to neaten the final texture. As the texture resolution was somewhat low, some of the dust particles look a little pixellated, however this layer is only used to add variation to the clean materials created. Some additional fingerprints were added, however the resolution of the UVs made these details a little less effective.
By using the roughness, metalness and colour channels, with smart masks and generators, natural looking materials can be created leveraging a PBR process. It was important to nail the values for roughness channel, as well as metalness channel to help develop a realistic looking PBR result.
These materials were applied in-engine and can be seen in the previous lighting scene development. Some additional tweaks to the roughness/metalness channels may be made to reduce the reflective properties a touch, however overall the materials reflect the reference quite closely. The shader network:
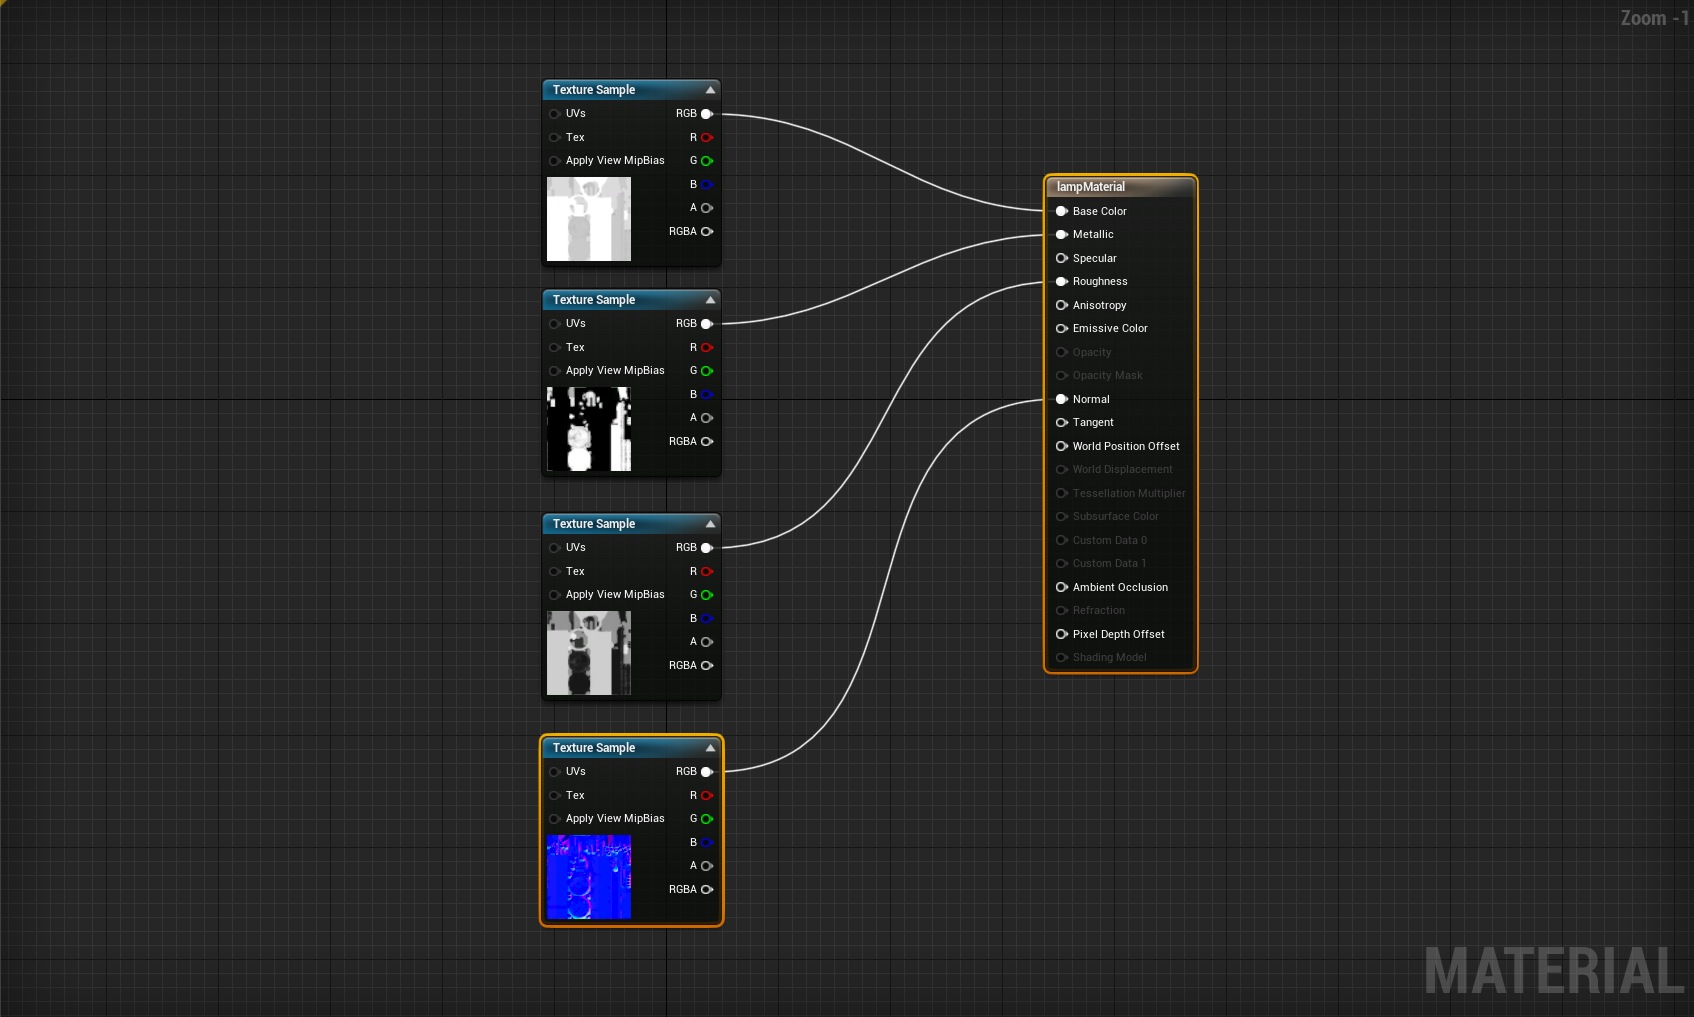
Some adjustments were made on a different shader to help make the lampshade interact with light sources more organically. Sub Surface Scattering is used as it distributes light particles through the surface of the material. This helps the lampshade appear as if it is emitting light, and shows the globe within the object, transmitting light through it.
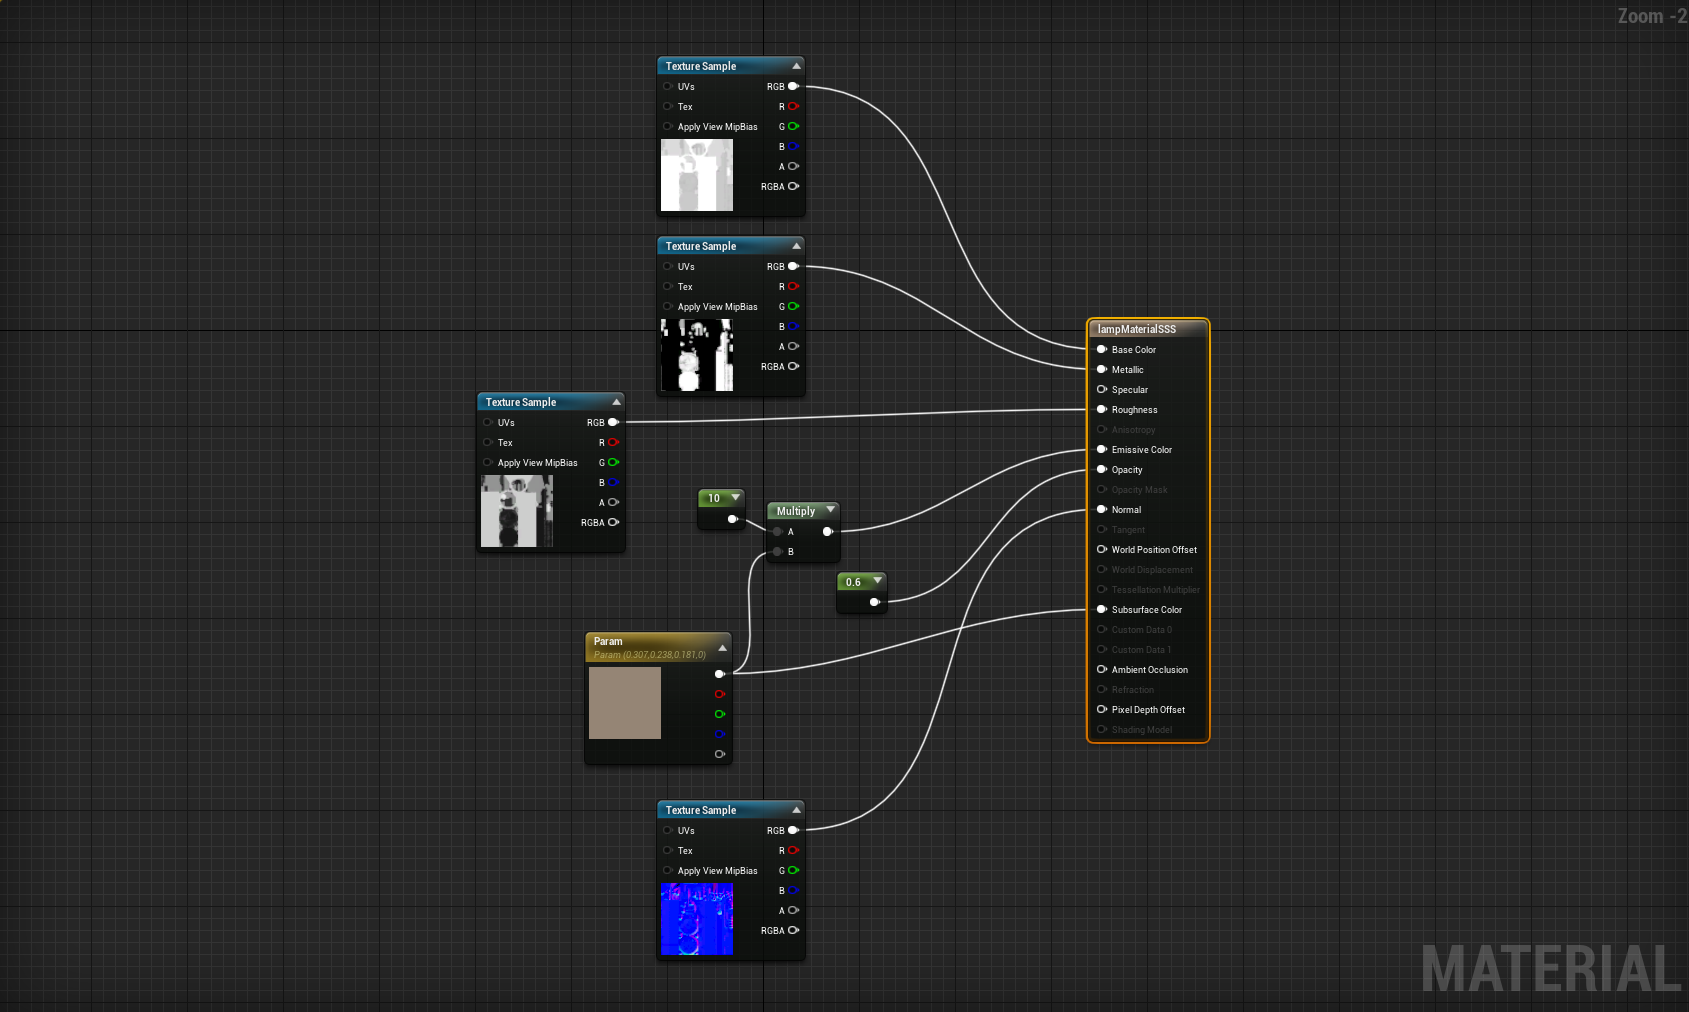
A Subsurface Colour was added to replicate the look of light penetrating the object. Opacity controls the amount of Subsurface Scattering occuring on the object. As the material was casting shadows, and the light should be picking up on the translucency of the lamp shade and casting that light, a multiplier was used and plugged into Emissive channel to create some light emission from the shade itself.
Substance Painter Workflow Reflection
Focusing on the development of textures from a PBR approach proved to be quite easy within Substance Painter. Adjusting metalness, roughness and colour values on base materials, and blending varied material properties using masks is an intuitive way to help define custom materials. The ability to manually paint in detail adjustments made it easy to adjust masks and create further organic patterns and textures. Exporting these materials into PBR ready textures, and setting them up within UE4 shaders was painless. Further exploration of techniques within Substance Painter will be valuable, however the overall workflow to create PBR textures ready for UE4 is understood.
Substance Designer PBR Materials
The Substance package contains a wide range of tools to help in the development of textures. Substance Designer offers a different approach to the development of materials for virtual applications, which works off modular procedural based workflows, instead of bitmap driven texture creation. The benefits for this are smaller file sizes for textures, and increase ability to adjust and modify these materials in engine to create dynamic, organic looking results.
An interview of Environment/Prop Artist Abderrezak Bouhedda (2019) published on 80.lv provides some insight into best approaches for those learning Substance Designer, and how a beginner can learn how to create procedural textures in Substance Designer. Some points raised:
- Reference is important – making sure you have enough reference to build the material.
- Analyse main shapes – identify repetition, geometry, patterns within the reference as these can be used for a basis to build your texture from.
- Keep it simple and clean – big node networks can get confusing and messy.
- Order of creation > Height Map > Normal Map > Ambient Occlusion > Roughness and Metalness > Colour/Albedo.
- Colour channel should be crafted via using selectors, curvature, normals, ambient occlusion and blending elements together.
- Some suggestions on nodes to use to create patterns and textures, and distribute them across the texture.
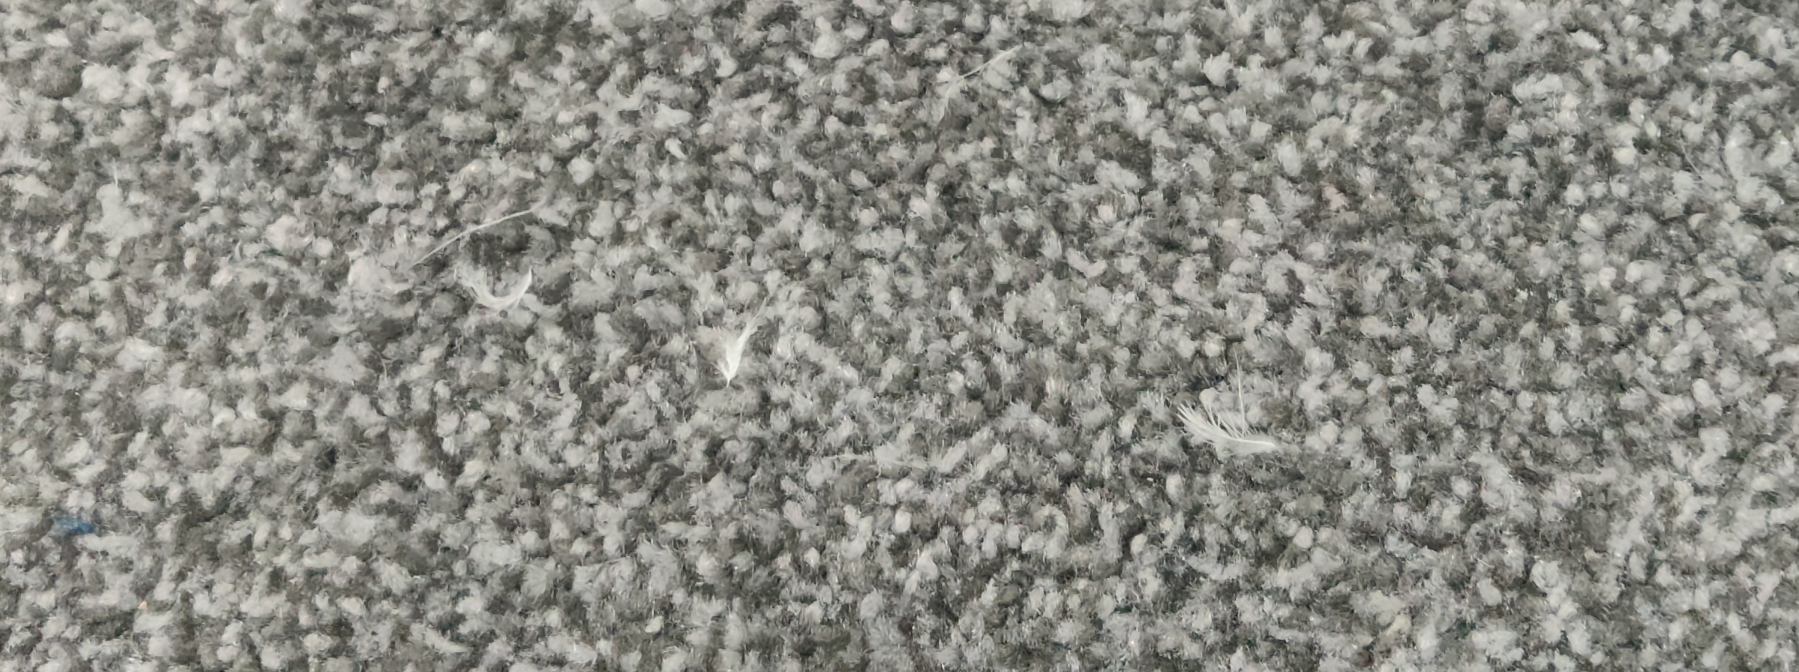
With these notes in mind, a reference image was gathered of carpet. Key observations are the varied colour within the individual thread of the carpet, some random hairs and goose feathers from the duvet on the floor. These details will help create a visually interesting carpet material, as suggested by Ritossa in his interview with 80.lv titled Learning Substance: Professional Tips and Tricks (2017).
StruffelProductions on YouTube has a Substance Carpet shader network walkthrough which shows the construction method of a modular carpet material. This is different than a tutorial, however it does clearly demonstrate the thought process behind the construction of the material. The video was used to help build up an understanding of construction process for Substance Designer PBR materials.

StruffelProductions appear to follow the approach raised by Bouhedda, breaking the material down into components (individual wool strands) and using these components and shapes to duplicate and blend them. Following this approach, individual strands were created with some variation (4 different versions to create randomness).

The four versions of the strand were combined using a tile sampler with pattern input selected. These were distributed on the texture, and modified using a noise pattern to create an organic flow – this prevented all the strands from pointing in the same direction. The resultant heightmap represented the carpet texture. This is a close up screenshot of the pattern tiling.

A scratch generator was overlayed to simulate grey hairs on the surface of the carpet. The lighter colour ensures these elements sit on top of the surface, as a darker grey would not be placed on the top when the normal map is generated. Additional feathers were added with the use of a bitmap texture (512×512) – a few feathers were sampled and distributed on top with a tile sampler and a blend mode.
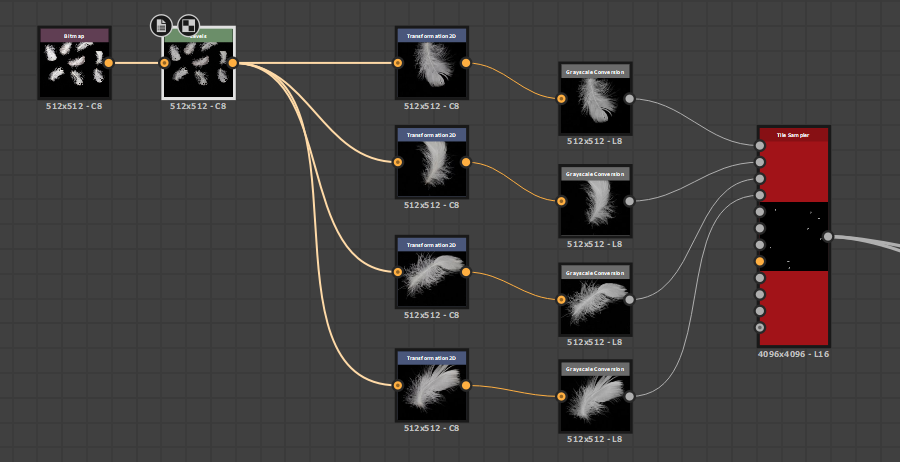
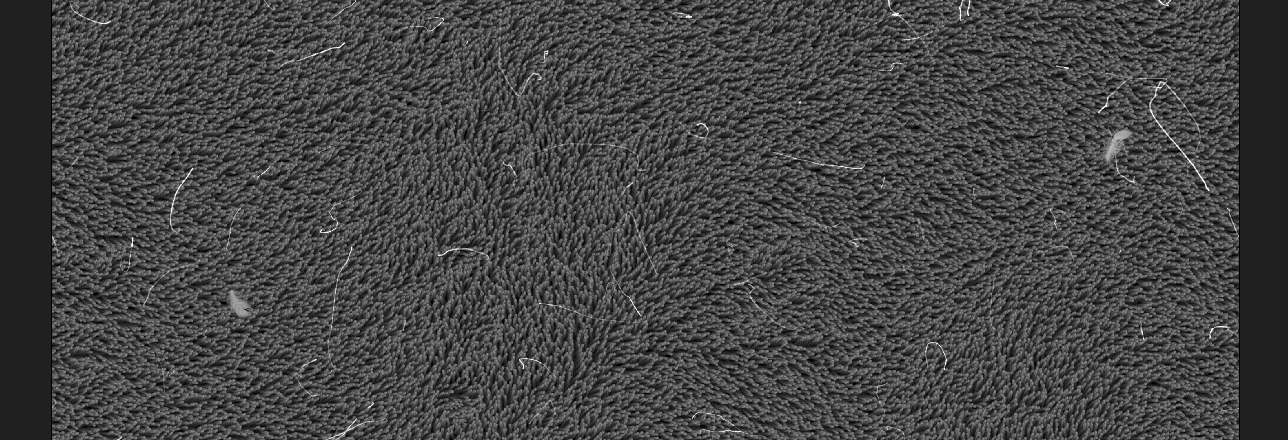
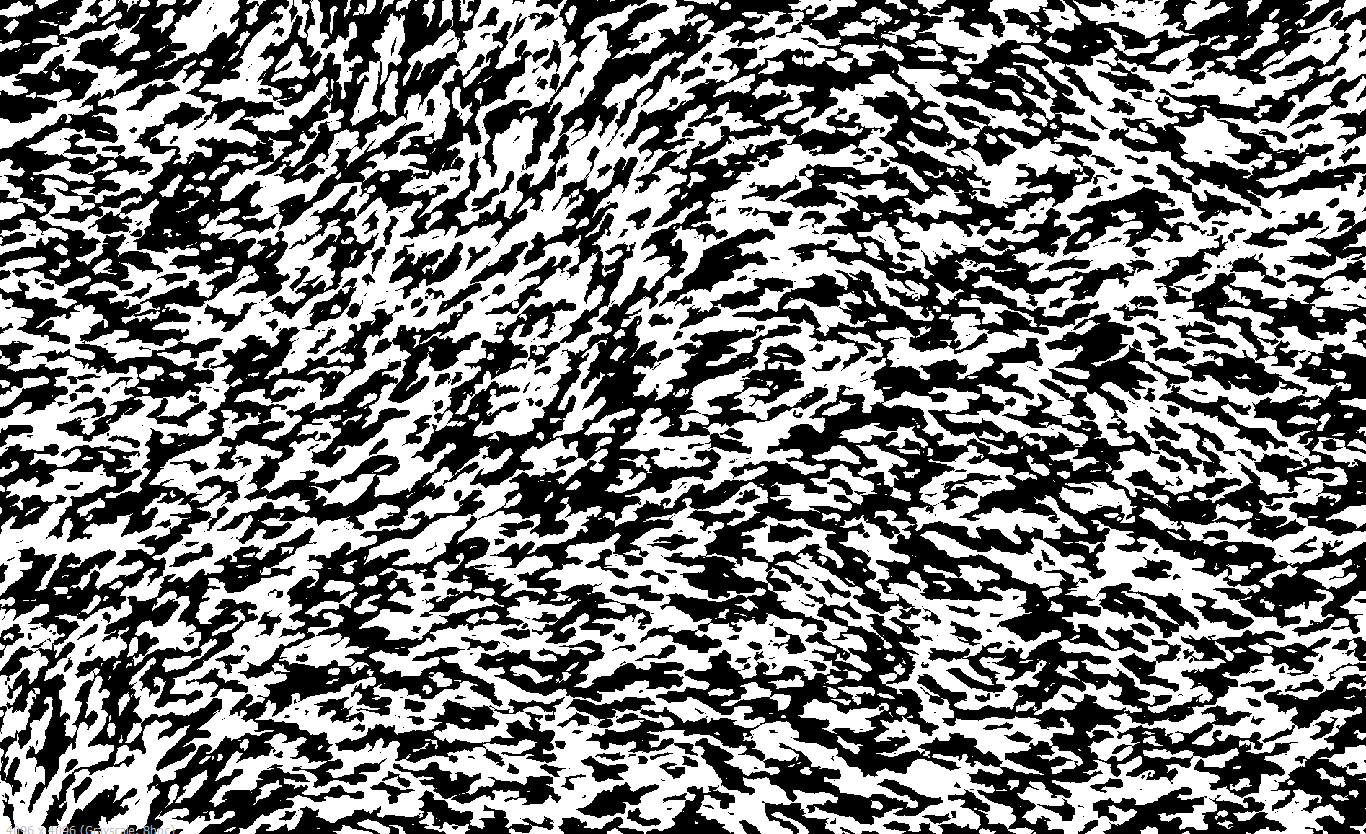
The resultant height map displays a randomly oriented, organic looking carpet that can be randomised by adjusting a noise channel, hair and feathers distributed randomly – the hair and feathers are also positioned on the top as they are closer to white value. The hair and feathers can be removed, increased or decreased depending on the desired result.
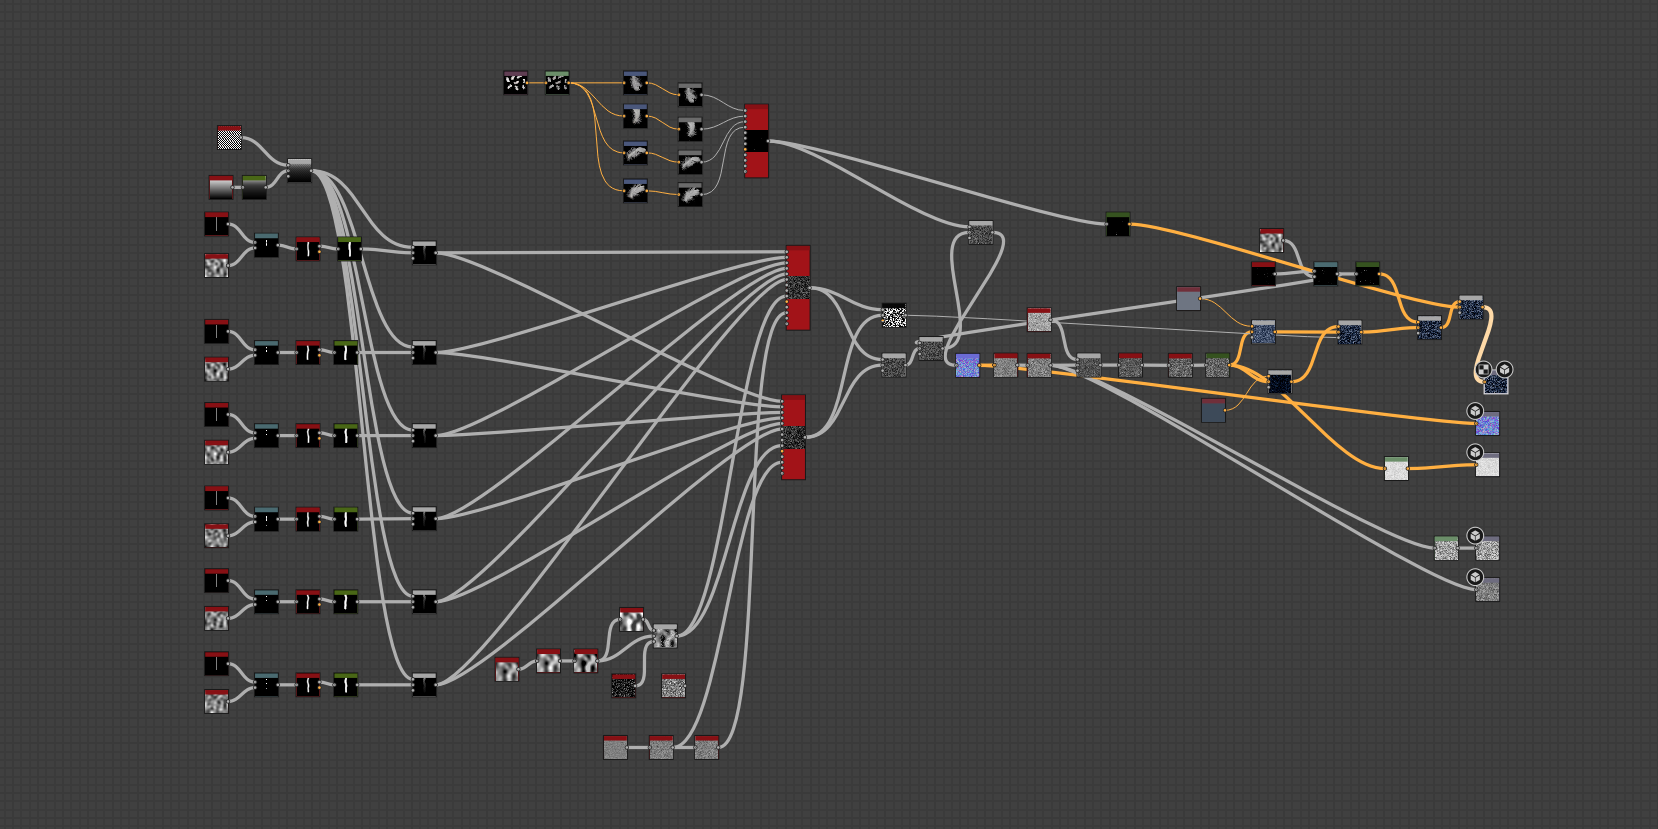
At this point, the height map was resolved with carpet fibers, hair and feathers being present on the final height map. The colour needed to be applied. The majority of the node networks were created to define the form and position elements. The height map depth was used to create a black and white mask of various strands – the mask applied black colour to strands that were in front of the secondary strands, which were white. Using this to mask out colour channels allowed for accurate variation of coloured strands of the carpet.
Two colours were created, and the mask was used to constrain the secondary colours to the white areas. The result was a carpet texture which was two tone, randomly placed – these colours could be adjusted, as well as the distribution of these colours on the carpet material. The feathers and hair were blended over the top with the appropriate colour to create the final colour channel
Substance Designer has a file format which directly imports into Unreal Engine 4, which allows for modification of exposed parameters directly in the game engine. Modifying and saving these parameters updates the material properties, and directly rebuilds/exports the texture maps within Unreal, without the need to open Substance Designer.

The result is an interesting looking carpet which can be modified within Unreal to add more feathers, remove feathers, change the colour and pattern of the carpet. Adding to this, the carpet is tileable, meaning it can be applied to larger surfaces.
Substance Designer Workflow Reflection
Substance Designer is quite a complicated piece of software, however extremely powerful. Through the creation of individual components, specific control is afforded to control each element within engine removing the need to open up the Substance project and modify/re-export the materials. Organic randomness can be achieved through using random distribution nodes and generators. PBR textures can be easily achieved, with specific control over the visual quality of each component within the material. The workflow from Designer to engine is seamless and extremely good. Substance Designer is an extremely good tool for the creation of seamless textures which can be created down to the smallest detail.
Substance Alchemist PBR Materials
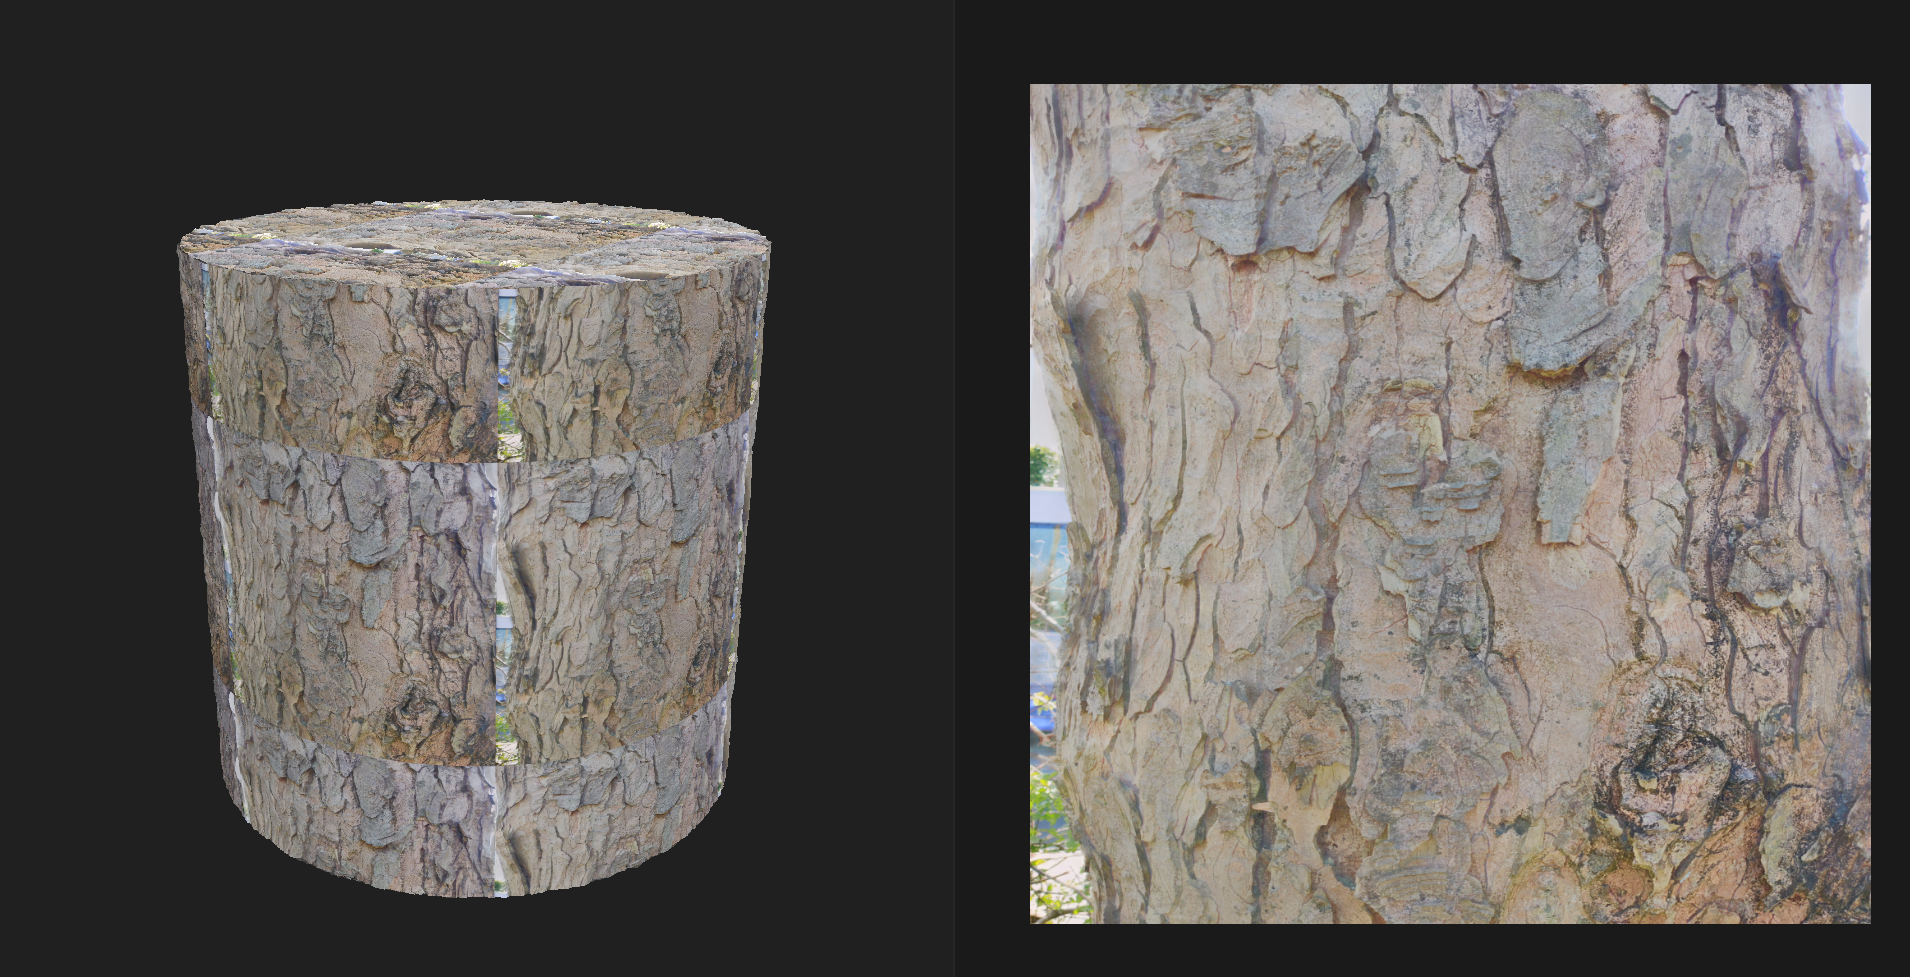
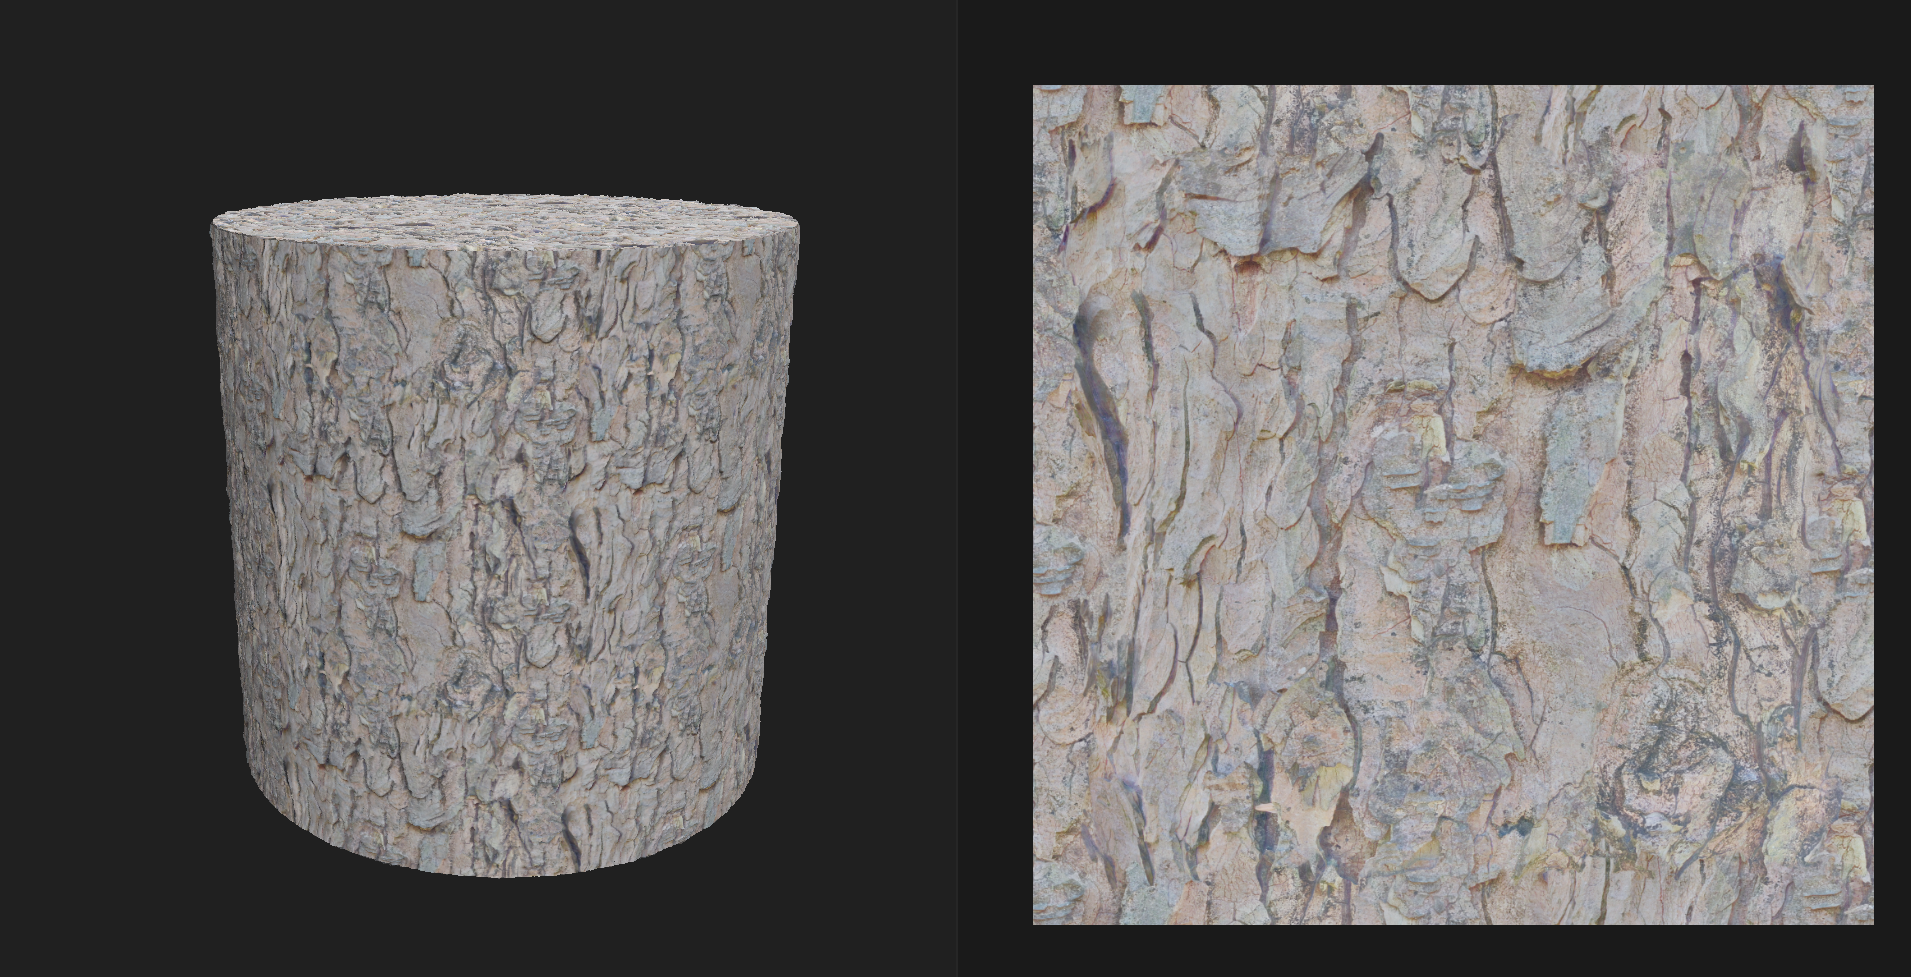
Substance Alchemist is primarily used as a tool to blend multiple materials together, however it does have the ability to create original materials by extracting image data and creating materials from this information. Using AI analysis, the software can analyse photos to extract Normal, Height, Colour and Roughness values from the photo and assemble a base material.
To start exploring Substance Alchemist, a range of exterior photos were taken of different textures and patterns. Where possible, organic forms were sourced as these can be some of the more difficult things to texture in standard workflows. Whilst Substance Designer allows you to modify individual forms and create custom materials, it can be difficult to get organic looking forms from rigid generators. The promise that Substance Alchemist offers is extraction of height and colour information from photos, so I wanted to test the ease of this in practice. If this can be done effectively, achieving realism on organic materials would be much easier and potentially more accurate.
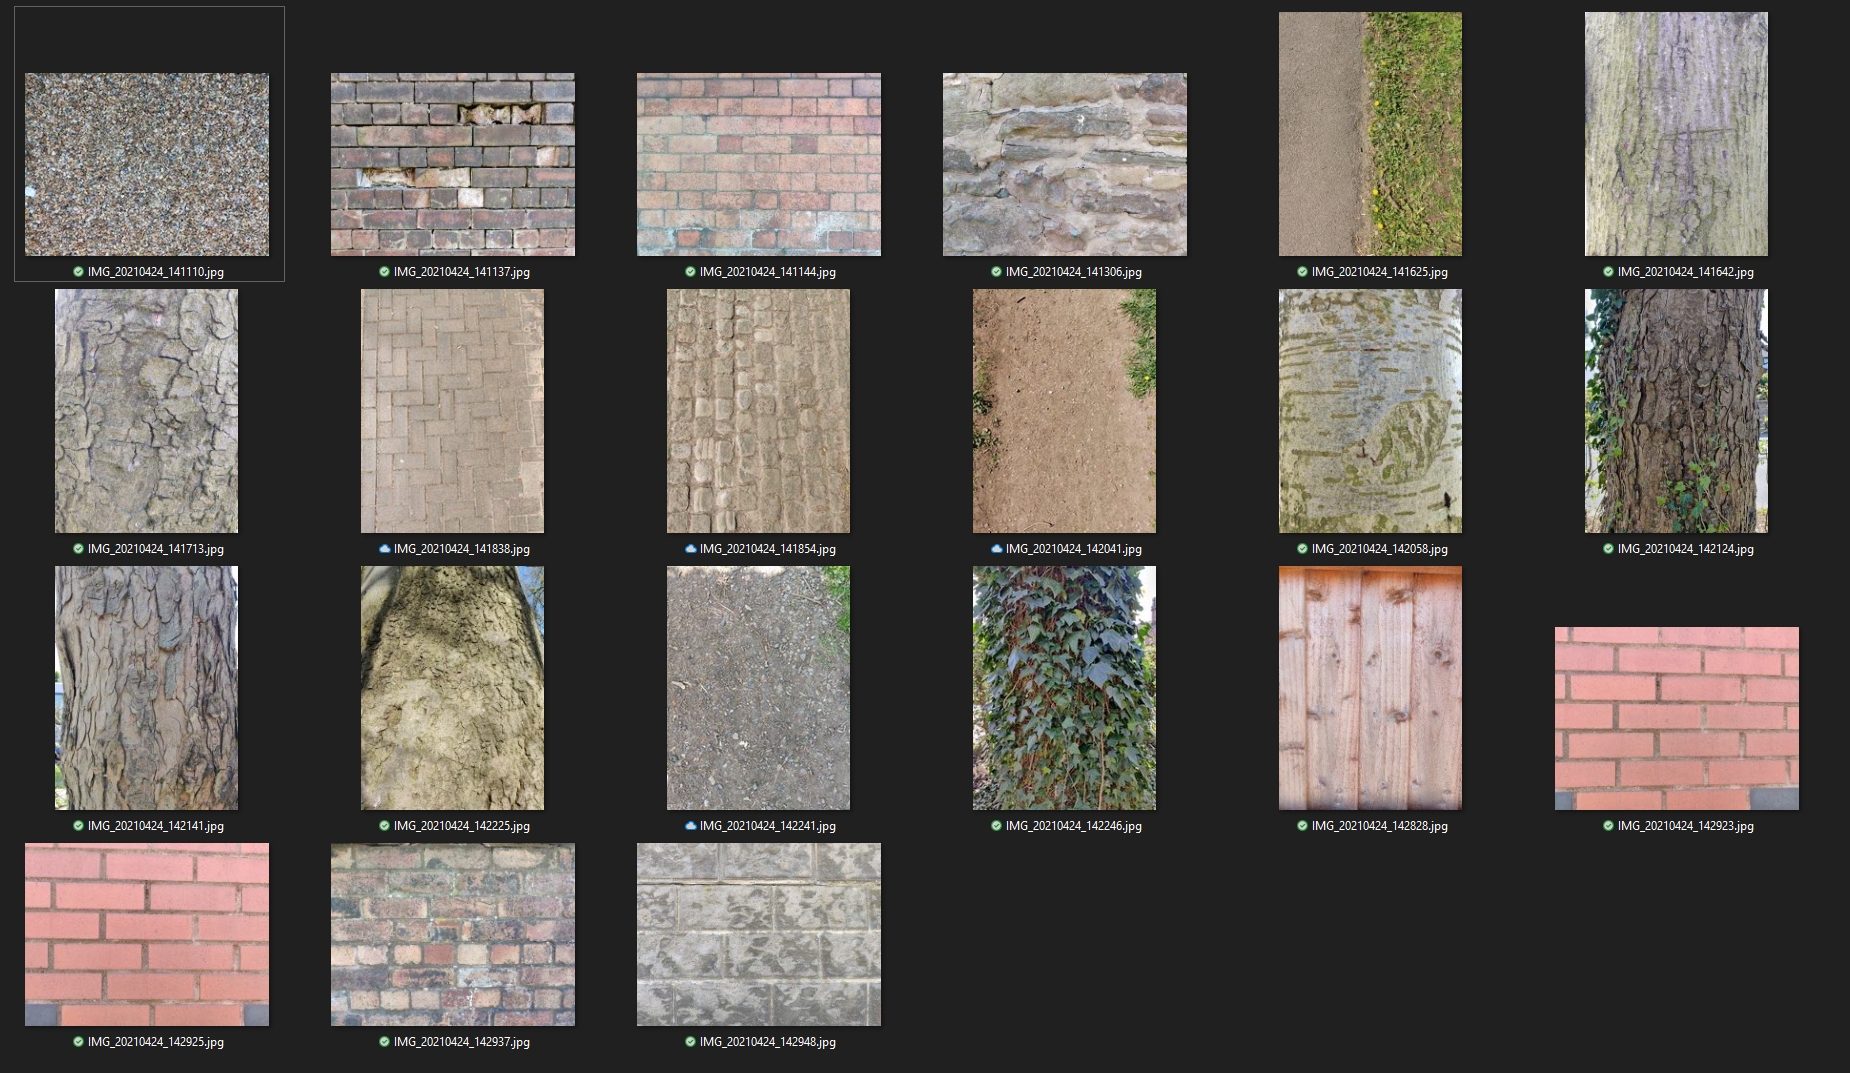
Care was taken to photograph these textures without direct sunlight, as the highlights and shadows created by the sun can create issues when trying to tile or identify height information. Rather than follow standard process of creating a seamless/tiling texture in Photoshop, I attempted to use the tools available in Alchemist to blend the seams together.
Additional details were layered onto the brick to create some grime and dirt in between the cracks – this was partly to help define the individual bricks, and also to help build visual contrast between the bricks. The before and after can be seen below, from the original to the 3D material created using Substance Alchemist and the AI Powered analysis. Whilst the patterns may not be 100% perfect, the potential to refine and tweak the brick patterns to achieve a seamless texture is high.


As you can see in the image above, the texture applied within the scene works quite well. Further refinement on the tiling and scale of the pattern would strengthen the result. Importing this into the scene was identical to Substance Designer, as Substance Alchemist exports a .sbsar file which automatically imports all relevant texture maps and connects these to pre-configured shaders.
To test what Achemist can do in extreme situations, I performed two tests. One was to take an extremely organic looking image as a base, which wasn’t close to tiling, and see if I could extract a usable texture from it. The second test was to see if I could build a texture from scratch in Alchemist alone.
With a straight AI analysis of the material, it can extract normal and colour information, however there are extreme seams present within the photo. As part of the AI process, it attempts to reduce the colour channel down to an albedo map without any light information present.
Applying a ‘Make it Tile Advanced’ modifier to the texture, and adjusting the settings surprisingly generates a usable tiled texture of this original source file… It seems to do this by unifying all the colours, and using smart analysis of the material to fill in the borders with seamless patterns and textures. Blending in further layers to create moss, dirt, colour variations etc can help push this to a more realistic result, however as a base material I was extremely impressed by the AI tools within Alchemist.
The last test was to attempt to create a material from scratch within Alchemist. Alchemist offers a tonne of generators, from tiling patterns, cracks, scratches, gravel, bricks, gum and water, so some textures can be created. It also offers a suite of base materials to start from.
Using a stone base, a generator was used to create a tile texture, randomness was added to the roughness channel, some cracks were added to individual tiles through a masing method to isolate the cracks to specific tiles, some adjustment to the height was made to chip away at the edges of the tiles, dirt added as well as scratches. The result is a texture which is adequate, however a little limited. It appeared to be difficult to control different height properties of elements on the material, and difficult to specifically control roughness areas. With that being said, the texture did look somewhat usable when applied to the wall in the scene.

Substance Alchemist workflow reflections
Substance Alchemist makes it very easy to develop materials rapidly. The ability to use source photos and AI material analysis to create Colour, Normal and Roughness channels is quite powerful given these details would be both difficult to paint using Substance Painter, and difficult to create organically in Substance Designer. The ‘Make it Tile Advanced’ feature is quite incredible, as it can take a rough original source photo and create a usable tile-able material from difficult organic patterns. The blending methods within Substance Alchemist also seem quite powerful (not demonstrated on this blog), however Vertex Blending within UE4 can produce similar results. Less control is present when it comes to individual colouring, channel manipulation and overall material tweaking, however given the simplicity of using an image to create a base of a material is very appealing for very difficult organic materials.
Material Study Conclusion
Materials play a large role in the development of a scene, with light Global Illumination directly being impacted by the materials present within a scene. PBR materials are comprised of a few channels, colour, roughness and metalness, and can effectively create any material which interacts directly with lighting accurately. The Substance toolset provides a wide range of methods to create some realistic looking materials, whether it be by manual painting and material development approaches, procedural generation using generators and shapes, or by starting with a base photo to build off. It is evident realistic PBR materials can be created through each application, but there seems to be a logical choice between which software package to use depending on scenarios.
Object Texturing
For individual objects, Substance Painter is a fantastic software package. The ability to work on object level material properties and add small details directly into each individual channel (colour, roughness, metalness) allows for great flexibility to avoid flat looking materials which look too pristine. The generators are powerful in controlling dynamic masking to create dirt and dust, and controlling which channels these details impact. The high-poly to low-poly baking process makes it easy to extract details and apply them to an optimised mesh. The ability to paint masks directly onto the model make blending and fine tuning the materials much easier.
Tiling Textures
Tiling textures such as carpet, wall material or any textures with pre-set patterns would be best created within Substance Designer. Substance Designer provides extensive abilities to control not just the depth of elements within a texture, but also roughness values and colour values. The ability to expose parameters within the node network and modify these parameters directly within UE4 makes Substance Designer such a powerful tool. Adding to this, materials created within Substance Designer are automatically seamless and tileable.
Organic Materials
Organic materials are difficult to create using any method, however the tool features available in Substance Alchemist make dealing with organic materials such as bark much easier. The power of the AI analysis nodes and the Tiling nodes help to create tileable, seamless organic textures. There are some drawbacks however as adjusting some parameters such as roughness and specific height values on each item within the material does make this a little less powerful than Substance Designer, but overall for organic materials and material blending, Substance Alchemist looks to be a useful tool.
Each tool within the Substance suite seems to be extremely useful in helping build materials which compare to real-life references. Controlling the colour, height and roughness values can help to create realistic looking material solutions for virtual production. The careful analysis of reference, and recreation of small details such as scratches, dust, dirt, hair and even feathers helps these materials look more realistic.
Bibliography
Bouhedda, A. (2019). How to Master Substance Designer? Interviewed by Arti Sergeev for 80.lv, 26 February. Available at: https://80.lv/articles/how-to-master-substance-designer-001agt/ (Accessed: 18 April, 2021)
Danjanov, N. (2019) Testing Substance Alchemist: 100 Materials in 100 Days. Available at: https://80.lv/articles/001agt-testing-alchemist-100-materials-in-100-days/ (Accessed: 17 April, 2021)
De Jong, S. (n.d.) Lighting Essential Concepts and Effects. Available at: https://learn.unrealengine.com (Accessed: 13 Feb, 2021)
Dinur, E. (2017) The Filmmaker’s Guide to Visual Effects: The Art and Techniques of VFX for Directors, Producers, Editors, and Cinematographers. New York: Routledge
Epic Games (2020), A first look at Unreal Engine 5. Available at: https://www.unrealengine.com/en-US/blog/a-first-look-at-unreal-engine-5 (Accessed: 3 April, 2021)
Faucher, W. (2021) Interior and Still Life Lighting (GPU Lightmass vs. Raytraced Lighting) Unreal Engine 4.26. Available at: https://www.youtube.com/watch?v=7RF8qlqSDh4 (Accessed: 20 February, 2021)
Kolb, D.A. (1984) Experiential learning: experience as the source of learning and development. Englewood Cliffs, NJ: Prentice-Hall Inc.
Okun, J.A., Zwerman, S. (2015) The VES Handbook of Visual Effects: Industry Standard VFX Practices and Procedures. New York: Focal Press
Ritossa, J. (2017) Learning Substance: Professional Tips and Tricks. Interviewed by Kirill Tokarev for 80.lv, 29 August. Available at: https://80.lv/articles/learning-substance-professional-tips-and-tricks/ (Accessed: 18 April, 2021).
Russell, J. (n.d.) Basic Theory of Physically-Based Rendering. Available at: https://marmoset.co/posts/basic-theory-of-physically-based-rendering/ (Accessed: 17 April 2021).
Seymour, M. (2012) The Art of Rendering (updated). Available at: https://www.fxguide.com/fxfeatured/the-art-of-rendering/ (Accessed 4 April, 2021)
StruffelProductions (2019) Substance Walkthrough #02 – Carpet. Available at: https://www.youtube.com/watch?v=VmY61W7XRZI (Accessed 4 April, 2021)
Taylor, D.C.M., Hamdy, H. (2013) Adult learning theories: Implications for learning and teaching in medical education: AMEE Guide No. 83. Published online 4 Sep. doi:10.3109/0132159X.2013.828153
Vacek, D., Tousek, D. (2015) Challenge #21: The Bedroom. Available at: http://www.3drender.com/challenges/ (Accessed 14February, 2021)
Wilson, J. (n.d.) Physically-Based Rendering, And You Can Too!. Available at: https://marmoset.co/posts/physically-based-rendering-and-you-can-too/ (Accessed: 17 April, 2021)


