
I’m interested in interfacing with UE4 in a variety of different ways. Part of my interests stems from my passion for both Film VFX, as well as Games and Game Engine stuff. I just can’t decide which one I like more… so I figure why not try and mix the two. Virtual cinematography is taking off, and I truly believe game engines such as UE4, and the newly announced UE5 will blend VFX and screen with Games seamlessly, hell, there’s already games which look realistic…
Where does the Arduino come in? Well, thinking about cinematography and compositing, it’s easy to look at commercial applications of real-time compositing which often use large digital screen stages to display the virtual environment, but what if you don’t have the budget for this? You could use green screen and composite that directly into the virtual environment, but you’ll need to somehow perfectly match the green screen lighting with the virtual lighting, which reduces the ability for you to have aesthetically pleasing virtual environments, as green screen lighting is designed to be bright, and flat. Not an ideal situation to be in for an indie setup. The Arduino gives you the ability to use electronic sensors to read values, and directly communicate that to UE4 and adjust elements in your scene dynamically. It opens up a world of possibilities, where you could potentially control physical based electronics from events within engine as well. Say there’s an explosion in your virtual world, you could theoretically control a real light using your Arduino, thus syncing up the real world footage, and the virtual environment. The possibilities are endless and I aim to explore some of this throughout my own personal study, and Masters study at Staffordshire University.
Setup
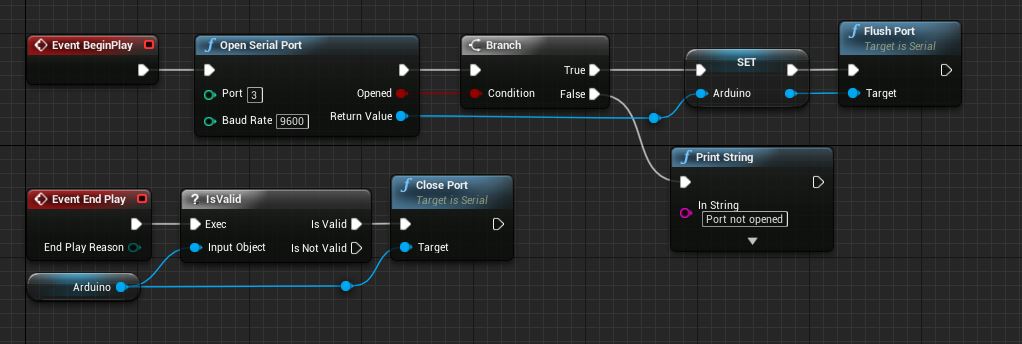
UE4 has one plugin which allows UE4 to interface with the Arduino – a plugin called UE4Duino provides two way COM port communication. Luckily, there’s a version available for 4.26, and hopefully this plugin will work with UE5 versions in the future. Here is the link for the 4.26 version of UE4Duino. The documentation of the plugin contains some simple but essential images showcasing how to open the port and enable the Arduino, how to read bytes, ints and strings from the Arduino.
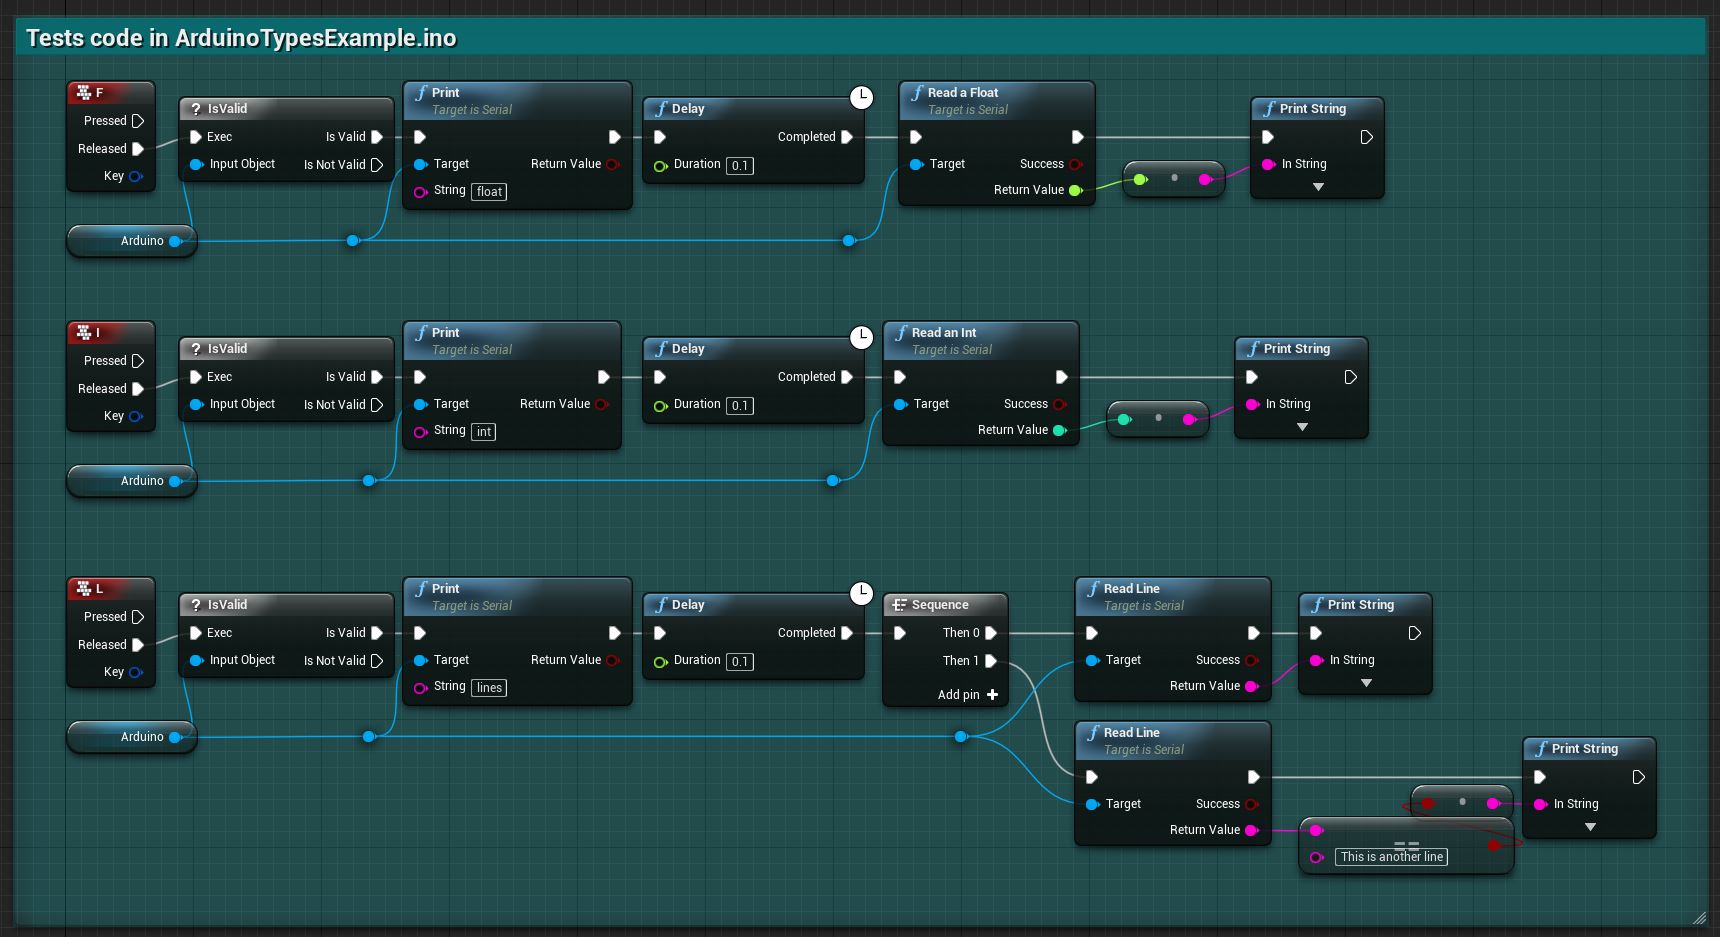
There is an Arduino script within the plugin which allows you to set up the same Blueprints and get set up quickly with the Arduino. Other than this, there isn’t too much documentation (AFAIK) – this process will be a learning experience for me as I am picking this up with minimal Blueprint experience and next to no Arduino experience.
Controlling a light in UE4 using a light sensor
I saw a video of someone controlling a light within UE4 using a light sensor on an Arduino, and that seemed to be quite an easy place to start the learning journey… A simple one sensor setup hooked into a luminance controller of a light.

The circuit is simple, 5.0v and ground hooked up to the breadboard +/-, positive wire going to positive of the Ambient Light Sensor (long leg), a wire reading the light sensor value going to the A1 Analog In (could be any input A0-A5), and then a resistor (10k) grounding the circuit. The code used in the Arduino software is below…
const int lightSensorPin = A1;
int lightSensorValue = 0;

void setup() {
  // put your setup code here, to run once:
  Serial.begin(9600);
}

void loop() {
  // put your main code here, to run repeatedly:
  lightSensorValue = analogRead(lightSensorPin);

  Serial.println(lightSensorValue);
}
The Analog In is specified by lightSensorPin variable, the Serial port is started with a baud rate of 9600, and the loop basically reads the value of the pin and prints it to the serial port. Pretty straight forward. The reading of the light sensor gives a number value between 0 and 1023.
This is read by UE4 using the OnTick event, where it reads the string being printed, converts it to a float value, and sets the lights intensity value to the value of the sensor. The result is the light changing intensity value per tick.

The result is you can control a light using local light input – this may need to be adjusted as normal ‘room light’ can max out the sensor, however it is very noticable in low light situations. Some math equations could help alter the scale of the luminance values to provide more control over brighter light conditions. The delay is used just to try and sync up the light adjustments to the COM port of the Arduino – without doing this, the light may flash on and off as it reads zero values, so just experiment with this (based on frame rate/computer speed).
To refine this, some simple math was added to the calculation to read 10 values and average these values out and print the result. This helps stop some spikes of light/dark, and smooths out the transitions, however not essential.
Adding Complexity – Additional on/off toggle
It was cool to get this working, however this is not very useful on its own. To help me with the learning process, I wanted to make sure I could have multiple sensors reading in UE4 at the same time. To keep it simple, I decided the next stage was to add a toggle button to turn the light on and off. This can be seen in the image below.
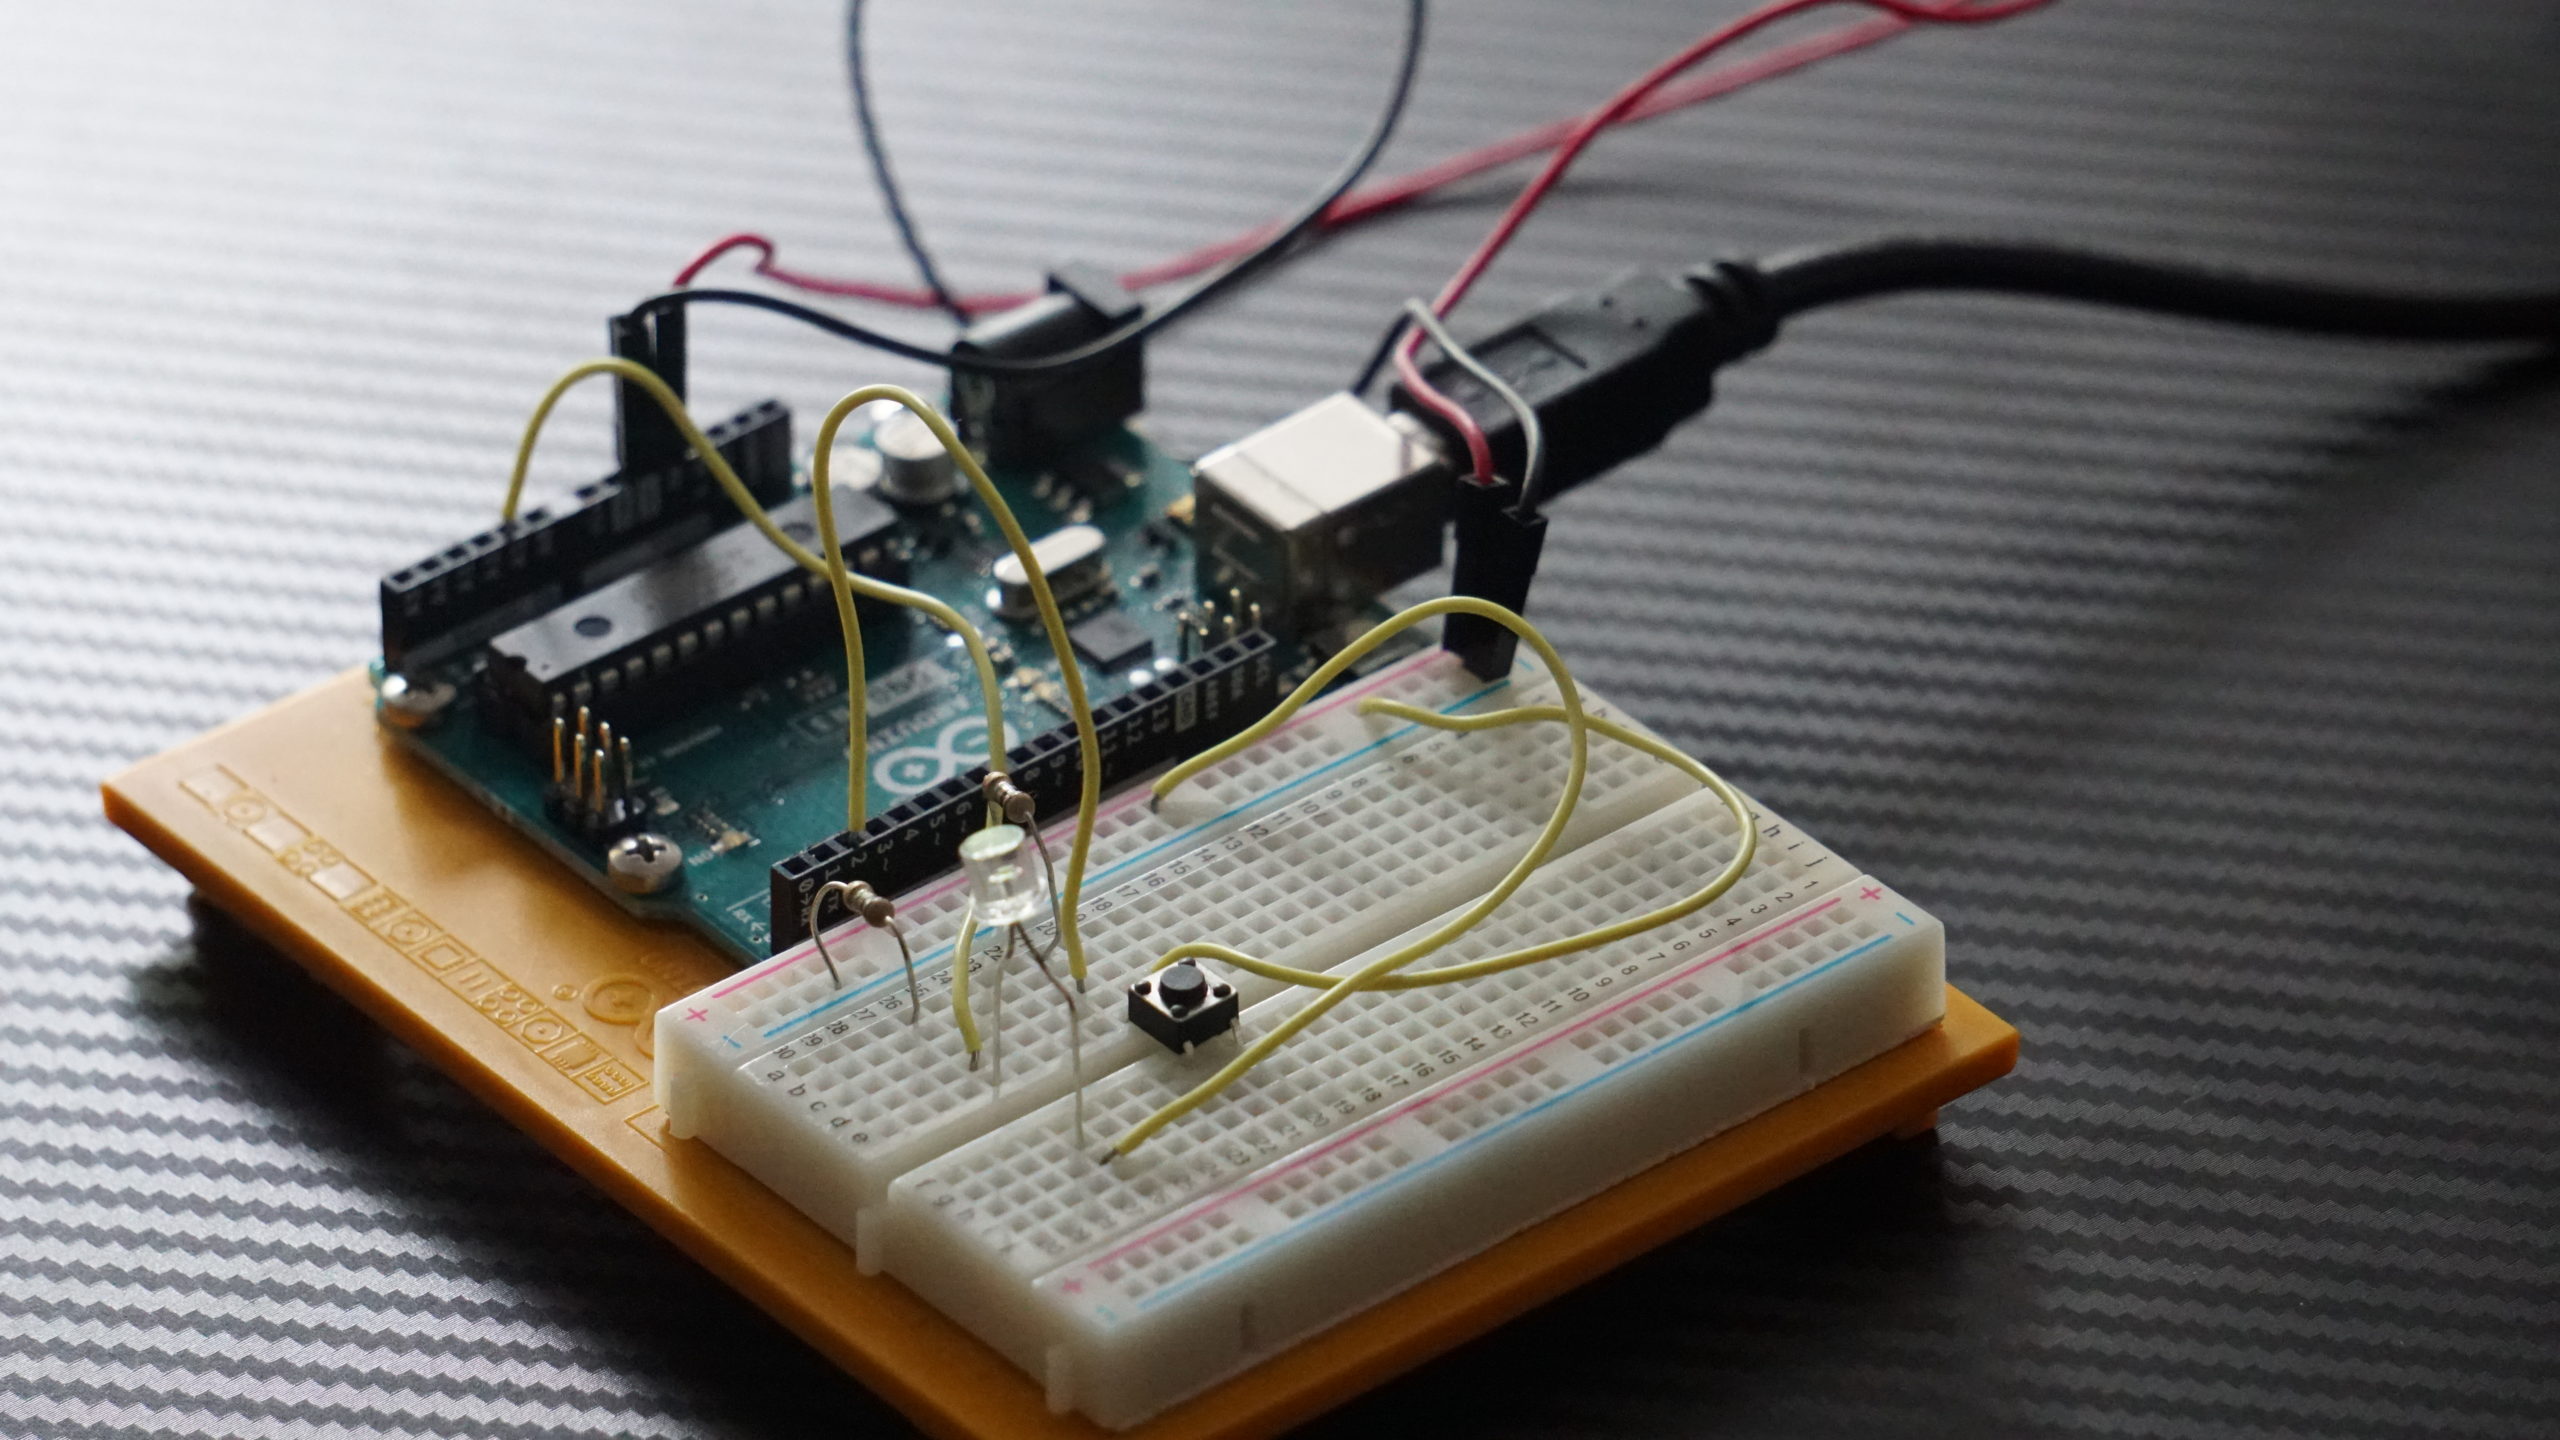
The switch setup is basically 5.0v into one side of the switch, ground with 10k resistor on the out side, with a wire between switch and ground sending state data to the Digital Input pin 2. This circuit is entirely independent of the light sensor, which could be 100% wrong (im sure this shows my lack of understanding of Arduinos and circuitry!), but it seems to work fine. Essentially, this button is in place to just tell the Arduino to toggle a variable on and off on press of the button, that’s all. This variable will be used to drive the visibility attribute of a light within UE4.
I struggled with this, as I wanted to send a boolean of 0 or 1 based on the press, however I found it difficult to use the integer correctly within UE4. My approach was to constantly send a button state to UE4 and update the light visibility every tick. I thought if I could get a Serial string printing alternating lines of the sensor value + button state, I could use a sequence to trigger two seperate events. This resulted in excessive flickering of the light as it would constantly read the intensity as off/on states. The solution was much simpler, to print to Serial when the button is pressed, with a toggle key word. This key word would trigger a light toggle state when printed.
Without going into two much details, this seemed to work quite well:
const int numReadings = 10;
int readings[numReadings];      // the readings from the analog input
int readIndex = 0;              // the index of the current reading
int total = 0;                  // the running total
int average = 0;                // the average
const int switchToggle = 2;
int toggleCheck = 0;

int inputPin = A1;

void setup() {
  // put your setup code here, to run once:
  Serial.begin(115200);
  Serial.setTimeout(5);

  for (int thisReading = 0; thisReading < numReadings; thisReading++) {
    readings[thisReading] = 0;
  }
  pinMode(switchToggle, INPUT);

}

void loop() {
  // put your main code here, to run repeatedly:

  // subtract the last reading:
  total = total - readings[readIndex];
  // read from the sensor:
  readings[readIndex] = analogRead(inputPin);
  // add the reading to the total:
  total = total + readings[readIndex];
  // advance to the next position in the array:
  readIndex = readIndex + 1;

  // if we're at the end of the array...
  if (readIndex >= numReadings) {
    // ...wrap around to the beginning:
    readIndex = 0;
  }
  average = total / numReadings;

  if (digitalRead(switchToggle) == HIGH) { // if button is pressed
    if (toggleCheck == 0) {
      toggleCheck = 1;
      Serial.println("toggle");
    }
    else {
      toggleCheck = 0;
      Serial.println("toggle");
    }
    delay(200);
  }

  Serial.println(average);
  delay(50);
}
And the blueprint which worked with the above code.
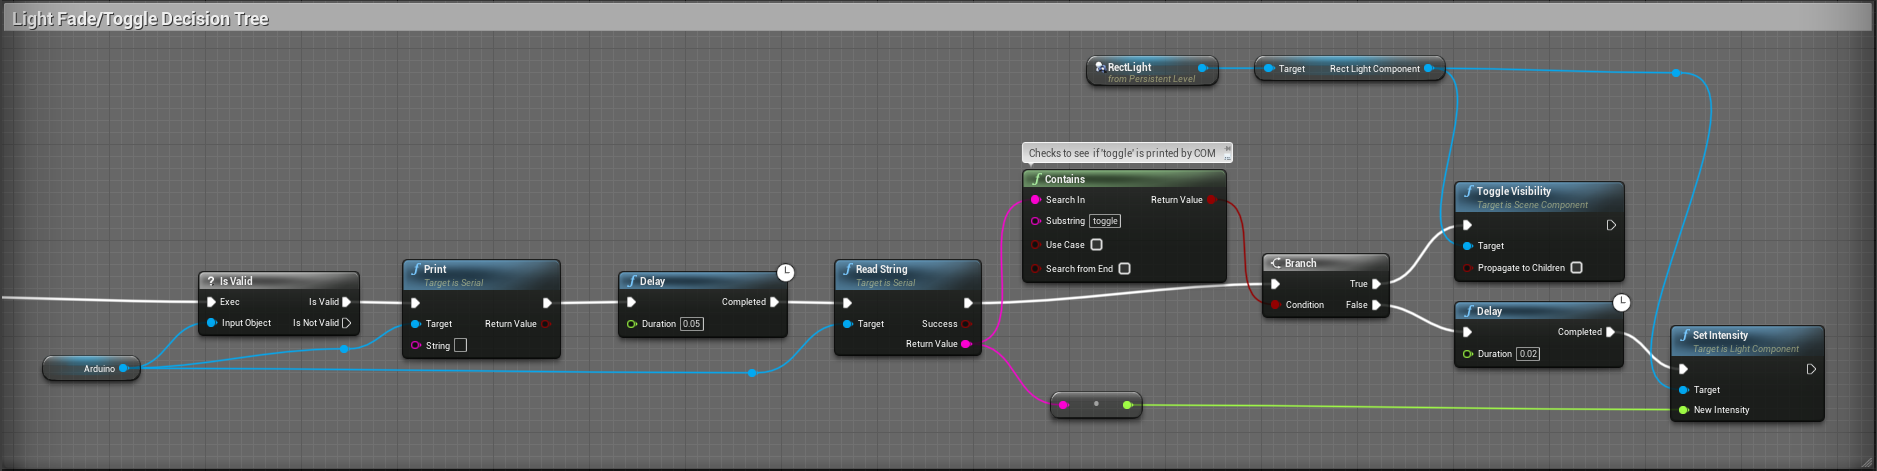
To break it down and how it works, the Serial COM port is constantly sending information to UE4, usually individual lines of light sensor values. When the button is pressed on the Arduino breadboard, the Arduino prints ‘toggle’ in the information line. When this is seen by UE4, it branches to True to toggle the visibility. If the Serial print is a number, it’ll convert that number to a float and use the float as the intensity of the light. Importantly, the light must be on lumens, rather than candelas (otherwise it’ll be extremely bright!). At the moment, this is being run on tick, however this may need to change as things get more complicated.
This is it working…
There are still a few issues present where the printed values occasionally skip a line and print a single digit or double digit, causing the light to flicker. This seems to happen on a specific pattern dependent on the delay within either UE4, or the Arduino code. I’m not sure if this is a desync between the Arduino rate, and UE4/USB… further work to be done to identify the issue, but overall I’ll count this as done and a success.
Outcome
So I managed to get the Arduino to drive the light within UE4, and use a toggle button to enable and disable this. Moving forward for this, I am keen to try different sensors to see what I can do with them. Use Potentiometers, tilt sensors, joysticks, sliders, temperature sensors etc to see what I can do with it. I am keen to set up some custom controllers for different compositing uses to either control virtual cameras, or even drive electronics in the real life. Imagine if a spark happens within a virtual environment, which drives a light in reality matching the video lighting with the game engine lighting… Lots of things to play with!


[…] from sensors and controls (buttons) from the Arduino to UE4 (can be found in the blog post titled ‘Arduino to UE4’), and figured out how to trigger the Arduino to execute commands based on UE4 events (can be found […]